
You are using an out of date browser. It may not display this or other websites correctly.
You should upgrade or use an alternative browser.
You should upgrade or use an alternative browser.
Andrew's GT Forte build.
- Thread starter rockhoppers1964
- Start date
Which model are you using, and how long for the print time?? They showed one on Jay Leno"s garage. Uses it for his hard to get parts on his older toys. There is an episode of his show on Utube somewhere.
Bill
Bill
Hi Bill, I use one from your side of the pond.
Its a Makerbot Replicator 2
It prints in ABS and PLA.... plastic basically. the difference being, PLA is "green" to make and use.
It took about 4 hours to print one set of clamps / brackets. But for comlicated items it can take 12 hours or more. I print at a resolution of 0.1mm.
Have to say it is strong stuff, had a mate think it would break. he spent 10 mins trying to destroy it by trying to snap it, jump on it even hitting it with a hammer..... its still in one piece.
I am sure Jay Leno has a better one than me. You can get them to print using metal now and they also use them to make artifical hips and new teeth !
Andrew
That is excellent and the best use of these 3D printers I have seen on a GT40. Well done. I know how long it took to make mine (3 hours) on the mill and this is much better. Great to see.
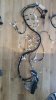
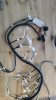
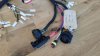
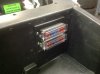
Wiring loom arrived today.
Looks just the ticket.
Answers a lot of questions having it laid out on the floor.
Looks just the ticket.
Answers a lot of questions having it laid out on the floor.
Attachments

Renato
Lifetime Supporter
Hi Andrew,
Nice progress!!
I was thinking along the same lines as Keith and didn't panel the sides yet. Did you think about how are you going to panel the inside of that area so you don't have fuel pipes running inside the cabin?
Did you fill in between the paneling with foam or insulation? I'm not sure which way to go with that.
Regards,
Renato
Nope it's the same Keith, I have panelled that part with the intention of cutting an access hole for the door to swing into. Just wanted it to be seamless round there, for purely aesthetic reasons.
Andrew
Thanks Renato. Your build thread has been extremly good at giving me direction.
Yes, i have given it some thought about how panel that area, but still not 100% sure yet. I want to get the hinge and door mounted to see how much room the swing of the door needs before i commit to anything, however i do intend to put a panel in there and secure it with rivnuts for future access.
I put "Silent Coat" 2mm and 4mm sound deadening sheets between all the panels before they were secured. It was good stuff to work with and allready makes the car sound more solid. I know that sounds strange, but its true.
Andrew
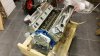
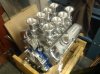
Hi Paul.
It s a blueprint engine.
Ford 306 Base BP3060CT | BluePrint Engines
I did look at building one myself, but by the time i had got all the parts selected and ordered and then assembled the price was not a kick in the rear of the fully assembled and tested Blueprint engine.
It may get some upgrades once the car is up and running, but for the first road going "release" i think it will be fine.
Going to change the rockers and the sump, but thats all for now.
Looks good for a crate engine.
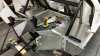
Had a day off yesterday and the engine arrival inspired me to crack on with the engine bay panels. Still need to cut some holes for services and suspensions arms but that should not be too difficult once I work out where they are to go.
Hope to get the rest finished today.
Andrew
Hope to get the rest finished today.
Andrew
Attachments
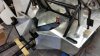
Engine bay done, and that is pretty much it for the panels.
A few holes to go in and some tidying up but apart from a couple of small trim panels here and there, all the big complicated ones are now done.
The rear bulkhead panels where rivets on after these pictures were taken, but had been sitting inplace for several weeks.
Only just noticed in the pictures that my mate had decided to lightly polish my initals into the last panel to celebrate. That will get painted over !!!
Time for a beer !
Andrew
Attachments
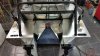
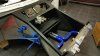
A little Good Friday progress......
Put fuse blocks in and printed a 3D cover to go around them to seal it nicely to bulkhead. Mounted relays.
Mounted A/C unit under dash, it can move back and forward and up and down on it mounting till i get the position right.
Made template to isolate the fuel filler area from the cabin.
Playing with wiring layout and routing.
Sat my new swirl pot in place.
Lots a little things....
Oh and fitted the ITB's to the engine.
Attachments
<small>Hi guys, work commitments and a new bathroom have prevented me making much progress, but ....
A whole day on the car with no or little interruptions !
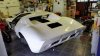
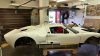
Was targeting getting the spider and front clip on for the day, but achieved a bit more than expected. Started by getting the laser level out again and checking the centre line of the car was correct and marking it up. Everything was then set from that centre line. Not sure if other have done it that way but it made sence to me to find a datum.
Put the spider where I felt it should be and laid the screen on to see how it sat, not to bad really.
Then offered up one of the doors and adjusted the front edge of the spider to suit the door and the 920mm spacing as it says in the build manual.
A little bit of give and take here and there, but always keeping the laser on and the parts aligned.
The rear upright face of the door was used to adjust the rear of the spider forwards or backwards to suit it profile.
Put the front clip on and low and behold it fits almost perfectly to the new position of the front of the spider.
So decided to push my luck and go for the rear clamshell as well and see how that mated to the spider.
Needs a bit of attention inside to get it around some of the chassis, but in general it lines up about right and when viewed in relation to the rest of the body I have to say Ii am quite happy so far.
There are a few minor issues but nothing that can't be fixed with some light fettling... !
Quite surprised just how good it all joined together. what have I got wrong ?
Two or three pictures attached, looking more and more like a car now.
Off to the USA for 10 days so no more progress on the car, but got a few more parts to pick up at Summit Racing !
Going to drop the engine in next to see how it fits and what routing of the services are needed.
Regards to all
Andrew </small>
A whole day on the car with no or little interruptions !
Was targeting getting the spider and front clip on for the day, but achieved a bit more than expected. Started by getting the laser level out again and checking the centre line of the car was correct and marking it up. Everything was then set from that centre line. Not sure if other have done it that way but it made sence to me to find a datum.
Put the spider where I felt it should be and laid the screen on to see how it sat, not to bad really.
Then offered up one of the doors and adjusted the front edge of the spider to suit the door and the 920mm spacing as it says in the build manual.
A little bit of give and take here and there, but always keeping the laser on and the parts aligned.
The rear upright face of the door was used to adjust the rear of the spider forwards or backwards to suit it profile.
Put the front clip on and low and behold it fits almost perfectly to the new position of the front of the spider.
So decided to push my luck and go for the rear clamshell as well and see how that mated to the spider.
Needs a bit of attention inside to get it around some of the chassis, but in general it lines up about right and when viewed in relation to the rest of the body I have to say Ii am quite happy so far.
There are a few minor issues but nothing that can't be fixed with some light fettling... !
Quite surprised just how good it all joined together. what have I got wrong ?
Two or three pictures attached, looking more and more like a car now.
Off to the USA for 10 days so no more progress on the car, but got a few more parts to pick up at Summit Racing !
Going to drop the engine in next to see how it fits and what routing of the services are needed.
Regards to all
Andrew </small>
Attachments
Similar threads
- Replies
- 214
- Views
- 69K
- Replies
- 9
- Views
- 13K