Rcr 40-31

Chris,

I am concerned that the hinge you made in front of the nose may have thrown off your whole nose alignment

With the front mounting system we supply, camcentric bobbins...we support the nose in the same position and location as per original.

I have a feeling that your nose now has a twist induced in the location , and this has created your non standard fitment issues

I have not heard from anyone with a Mk1 with any issues or concerns similar to yours....and the only thing I can see non-standard is your front hinge/mount location system.

Knowing how detail oriented you are, I am sure you have thought through all this...and will ultimately do a finished job that you will be 100% happy with.

I do however feel that this was an avoidable circumstance given a phone call or two.

I am doing my best to be objective..not defensive about my RCR products but I am having a hard time justifying your mods to myself.

If other finished RCR Mk1 cars are compared, I dont recall anyone having had to deal with anything like this....
 
Last edited:

Chris Kouba

Supporter
Fran,

Yeah, that may be correct but it's also my first car and it's entirely possible that I mounted it in the incorrect position to begin with. The hinge may have exacerbated it.

With the work I did on the rear clip, I wasn't afraid to try to "fix" my work on the front. I started thinking about it when I saw this post and started to hem and haw over it. Last night I quit thinking about it and did it.

And as you said, once finished I will have the set up I want and be 100% happy with it.

And on the chassis set-up, I had the arms off before I started setting the alignments and the level and square out checking ride heights. As much as I like doing this, I only wanted to do this end once!

Cheers,
 
Chris,

as Dave Collins mentioned with his Mk2 ..we no longer use our original MK2 moulds/parts and have redone the Mk2 moulds..

As you so rightly say, it is your car and you will be 100% happy with it when finished and that is the important thing...now put down that turkey sandwich and get back to work..

I just dont want everyone thinking that they "HAVE TO" modify their bodywork...as this is obviously not the case.
 
Last edited:

Chris Kouba

Supporter
No worries, I figured that was your concern.

I knew what I have is my first build and I wanted to be happy with it in the long run. If it means a little extra elbow grease up front, I am happy to put in the effort.

Damn, you're at it early today... It's a national holiday man. Eat some turkey.
 
Run and Gun 2007 031.jpg

Run and Gun 2007 023.jpg

Here is a side shot of my car. I usually would be careful not to hijack your thread but I want to show you how my cars front tire clearance turned out. These are 17/225-40 tires. Very short, low profile. My street tires fit even tighter. After seeing what you did with the rear flares, I am sure you can make any changes you want like a pro. It just made me a little nervous so I thought I would through in some unsolicited opinion.
 

Chris Kouba

Supporter
Been hard at work, goal is for paint in January. We'll see what reality brings me. All this glasswork has earned a new respect for those who do this as a living, although I am sure they can do it more rapidly than me.

I intend to be shooting primer by the end of next week. Anyone recognize that front right wheel well? Looks a little different these days.

Dean- Thanks for the pics and comments. No worries about hijacking. My concern wasn't tightness but matching left side to right. Yours looks fantastic and I'm mighty jealous.

Cheers and happy holidays to all!
 

Attachments

  • IMG_2660.jpg
    IMG_2660.jpg
    37.6 KB · Views: 1,421
  • IMG_2655.jpg
    IMG_2655.jpg
    50.9 KB · Views: 1,446
  • IMG_2650.jpg
    IMG_2650.jpg
    53.7 KB · Views: 1,391
  • IMG_2652.jpg
    IMG_2652.jpg
    56.3 KB · Views: 1,433
  • IMG_2657.jpg
    IMG_2657.jpg
    43.6 KB · Views: 1,436
Hi Chris,

good fixing of the right front fender.

I´m not shure and it may be the photo´s perspective. but the front clip( cooler opening) looks that it is a little higher on the left side ( looked on it from the front).
May be there is also the reason for you different fender height.

TOM
 

Chris Kouba

Supporter
Tom,

The lead edge of the nose averages around 16" across the clip and the two side are +/- 1/8" of each other. Close enough in my book.

I will take a few more detailed measurements tomorrow but I am content with it.
 

Chris Kouba

Supporter
Graduation Day!!!

Tomorrow is the big day. I think I am ready to spray primer!!

I guess I'm not quite "done" with sanding yet but at this point there's a bright light at the end of the tunnel. And it's painted white with a fat red stripe.

It's also nice to be able to see the concrete floor of the garage again. There was a heavy layer of snow on the ground and everything was dusty.

More progress later, off to bed now.
 

Attachments

  • IMG_2737_2.jpg
    IMG_2737_2.jpg
    45.3 KB · Views: 990
  • IMG_2742.jpg
    IMG_2742.jpg
    28.5 KB · Views: 1,057

Randy V

Moderator-Admin
Staff member
Admin
Lifetime Supporter
I was wondering when you were going to update us on your journey!

Looking forward to more posts on your build!!! :)
 
Chris
great to see you are that far. Wish i would be there already but than i would have missed all the fun, wouldn´t i ?
White ( have you checked on the new P....... GT 3 white, it is just beautifull) with a single f.....i red ( F300 rosso corsa) stripe with two small red outlines is also one of my favorites. Think about the mustache, IMHO it distracts from the rest.
Add same bad black weels and it sure looks racy.
Good success tomorrow
TOM
 

Chris Kouba

Supporter
So no primer flowing yet, ended up being ready on the outside but there were interior details which needed attention. Things should pick back up tomorrow. It's all laid out, will clean the garage out again and then we're back at it.

In my spare time today I took a spin past a metal shop today and picked up a sheet of .090 alu and called up the Racing Icons site. A little time with the rear shot of 1076 and some tools and I had myself a spoiler. Came out pretty well for no mill work.

Off to bed now, up early tomorrow...
 

Attachments

  • IMG_2762.jpg
    IMG_2762.jpg
    61.3 KB · Views: 858
  • IMG_2763.jpg
    IMG_2763.jpg
    62 KB · Views: 1,103
  • IMG_2766.jpg
    IMG_2766.jpg
    51 KB · Views: 889
  • IMG_2767.jpg
    IMG_2767.jpg
    42.6 KB · Views: 1,056
  • IMG_2770.jpg
    IMG_2770.jpg
    45.1 KB · Views: 1,042

Chris Kouba

Supporter
PROGRESS!

I didn't take many in process pics. My day started at 0430 and I just rolled down the garage door at 0229. It was a LONG day but I finally feel like I made some progress.

I've got a few things to fix, then patch the primer over them and it's wet sanding time!

Before and after pics...
 

Attachments

  • IMG_2781.jpg
    IMG_2781.jpg
    50.3 KB · Views: 743
  • IMG_2787.jpg
    IMG_2787.jpg
    50.2 KB · Views: 760
Chris

Thank you very much for hosting Eric and me. We enjoyed our stay with both of you very much. Thanks for the time and for the track training.

TOM
 

Chris Kouba

Supporter
I think I've reached a milestone at this point.

I know I haven't posted in a while, and here's why. I got incomplete instructions as well as the wrong reducer for the primer from the body supply shop. Fast forward (after all the shaping, sanding, filling, sanding, priming, sanding and wet sanding) to the application of paint and it became something of a Hollywood special effect.

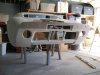
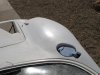
We masked for the red center stripe and mustache first, before the white went over the rest, and by the time we finished the last piece the first one was a mess. There was a reaction between the primer and the solvents in the paint (likely because the solvents in the primer were still there) and the overlying surface looked like alligator skin. Not orange peel, but genuine sun-cracked desert floor after a monsoon, watch out don't cut yourself on it, alligator skin.

That's a little overly dramatic but to say I was upset was an understatment. The paint just shrivelled upon itself.

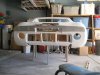
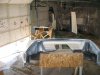
It wasn't going to fix itself so it needed to get stripped off. I tried a chem stripper for the rear clip and it ended up pulling off the paint, primer, filler, and even some resin and gel coat. I literally washed away about six months of my work.

I didn't go out into the garage for about 3 weeks.

The supply store realized what they did and graciously volunteered to replace my supplies (primer and paint is spendy!). Unfortunately I was on the hook for reworking the surfaces.

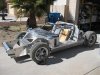
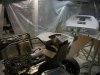
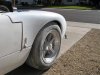
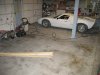
Subsequently I've been chasing my tail in the garage trying to get the flares filled and smoothed back in like they were and then sanding off everything that was on the car, back down to the gel coat.

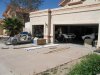
That's been a little work. It's hot (HOT) in Phoenix right now and I don't like working in 110°+ weather. The garage stays cooler, like 100°, but it's still HOT. Even though it's been this hot, as I sand I can still smell the solvents escaping as I open the surface to atmosphere.

The whole thing has been a little frustrating, but at this point I am through the worst of it. I have the small things in the rear clip to fix still and then to sand the doors and sills. The front clip and spider are done.

Someone said doing the car yourself that you'll learn about all of the mistakes you can make and that you'll end up doing most of them. I am still enjoying building the car but I am ready to never touch another piece of sandpaper again!

It'll still be a while before I make any forward progress but it does feel good to get things sanded and ready to prime again.

Chris
 

Bill Hara

Old Hand
GT40s Supporter
Chris
Feel for you mate. Hard lessons to learn but once learnt never forgotten. I had an experienced painter work on mine and I still had some problems. The GT40 shape is complex, with lots of different curves so sanding back without shaping the body into something its not meant to be takes experience. Applying chemicals in the form of primer/paint/solvents etc just makes things even harder. You have reached a milestone now so keep up the good work!

Bill
 

Rob

Lifetime Supporter
Oh man ......Chris, sorry to hear. That really does suck! I'm confident with what you learned the first time and your attention to detail, it looks even better this time.

Best of luck.....and keep us posted.
 
Back
Top