Rcr 40-31

John,

it is a standard factory specified mod. for the starter pocket only....only required for the ZF trans cars not the Audi or Porsche transaxle packages...the ZF cars then get a billet plate to replace the removed material.

If you have specific questions feel free to give me a call...
 
Thanks Fran,

Don't worry, I will most likely send you a large email in the near future. Although I don't like the idea I might even have to fly to your place...:)

John

PS. Sorry Chris!
 

Chris Kouba

Supporter
Re: Rcr 40-31 - finally some more progress

I have returned from sabbatical now and am getting back at the car. I gave Fran the go ahead to ship some pieces to me and am waiting like a kid on Christmas Eve for the package to arrive now. In the meantime I have been working through the less glamorous but none the less important tasks- door seals and body clips.

Progess, yes. Earthshattering, no. But I will post pics anyway.

It's good to be back in my garage!

So, no pics to post right now as I neglected to compress them before leaving the house. They will wait til later. Still glad to be back in the garage though.
 

Rob

Lifetime Supporter
Hey Chris....Welcome back to reality...:D

Now go spend some quality time in the garage already....slacker ;)


Looking fwd to seeing some updates.
 

Chris Kouba

Supporter
Compressed pics now... Although they aren't that exciting.

Where I am hasn't changed much over the past 4 months or so. Last thing I really did was the tilt nose thing. I left PHX on the 6th of June and just got back on Sept 2nd. I was in town for about 36h and had to leave again for three days, then worked a full week. So it'd been a while before I was able to spend quality time in the garage.

The car is caged and I am looking to get the body (again) to final (this time I mean it) alignment. The difference is the weatherstripping is on the car and you'll see the pics but I'll be soliciting ideas of what to do next. Basically, the roof section of the door is pushed up by the weatherstripping by 1/4 to 3/8 or so of an inch. I don't have any desire to add that much bondo or do that much bodywork so I am looking for suggestions of how to rectify this simply. I used seals from JC Whitney but am open to other ideas. Anyone?

I also had to do a little repair work of some self-inflicted knocks to the rear clip on the alignment spigots. That was a little work. I also saw Dean's work where he filled in the interior panel gaps on the rear clip and thought that'd be a good idea. I did both at the same time and it was more than I could deal with so I ended up re-doing a bit of it. But now I am even more experienced with the resin and glass work.

So, pics... Installation of weather stripping is on alu angle which I intend to bond to the sill when ready. The vertical portion is sheet screwed into the dash pillar. I intend to build up the door where needed to complete the seal. I am shooting for weatherproof.

I also installed the clip latches. Right now the $1200 Hartwells from ERA are a little out of my league, so I put on the ones from Fran. I had a hard time retrieving the hook when I unlatched it so I wrapped a spring through it and it will pop out when released. It's proof of concept at this point and the idea is good. I'll need to get something a little more robust in the future.

All this is fairly non-glamorous and I am just getting the grunt stuff done while I am waiting for my flares to arrive. The shifter should be in the box and a few other goodies. To say the least I am looking forward to the weekend!
 

Attachments

  • IMG_1973.jpg
    IMG_1973.jpg
    35.2 KB · Views: 1,709
  • IMG_1977.jpg
    IMG_1977.jpg
    45.4 KB · Views: 1,682
  • IMG_1979.jpg
    IMG_1979.jpg
    19.8 KB · Views: 1,677
  • IMG_1980.jpg
    IMG_1980.jpg
    22.5 KB · Views: 1,630
  • IMG_1982.jpg
    IMG_1982.jpg
    25.4 KB · Views: 1,687
  • IMG_1985.jpg
    IMG_1985.jpg
    26.9 KB · Views: 1,683
  • IMG_1987.jpg
    IMG_1987.jpg
    27.3 KB · Views: 1,660
  • IMG_1996.jpg
    IMG_1996.jpg
    18 KB · Views: 1,693
  • IMG_1997.jpg
    IMG_1997.jpg
    18.8 KB · Views: 1,626
  • IMG_2003.jpg
    IMG_2003.jpg
    28.3 KB · Views: 1,725
  • IMG_2005.jpg
    IMG_2005.jpg
    26 KB · Views: 1,655
  • IMG_1991.jpg
    IMG_1991.jpg
    21.9 KB · Views: 1,628
  • IMG_1995.jpg
    IMG_1995.jpg
    17.6 KB · Views: 1,660

Rob

Lifetime Supporter
Chris,
One idea/suggestion:
Your roof is likely "drooping". Essenstially, there is no support for the front of the roof at the moment, as the windscreen is not installed, so when you close the doors, the roof likely drops down some from the compression of the seals. Would suggest making a wood prop to hold the roof at the correct position while your assessing this. Then you can determine what the actual misalignment it. I would suggest doing this by setting the windscreen in place and sizing the prop so there is just still a small gap at the top of the screen. I kept my prop in for ALL fitment steps.

My two cents....;)
 

Chris Kouba

Supporter
Rob-

SPOT ON!

I placed the windscreen and shimmed things up this morning and the mid-section of the spider now sits fairly nicely between the door sections. Unfortunately it also moved a few other things around and now I need balance things out again. At least I'm not adding gallons of bondo now!

Thanks!
 
My roof sagged 1/2" while at the painter. He talked to Fran about it. Fran said without the windshield bonded in, the roof will sag. My doors looked just like yours. Fran had my painter put a stick inside to push up the roof. The car sat in he sun for a week and now it's OK.

Bill D
 

Rob

Lifetime Supporter
Great Chris, glad to hear it.
I kept my prop rod in for monnnnths. I put it in and left it there until I was done with all fitment work. Then, on the cradle, I had it center loaded as well. If left with the weight on the pillars it's only logical that it will sag.

In an effort to make certain it ended up in the same place at final assy, I only used a few fasteners around the base of the screen unit l got EVERYTHING dialed in. Then when I was absolutely positive I was done, I drilled the rest of the holes around the front.

BTW... Bill's sun trick works wonders. If it gets warm enough you can massage and change the shap of panels as needed (heat lamps and heat guns do the trick too of course... :)
 

Chris Kouba

Supporter
It's propped and has been for a few days now, and will stay that way as well for a while. As for heat guns and lamps, not needed as I have returned to Phoenix and just as I remembered- it's HOT here.

I will let it set and keep the prop wedged between the cage and roof through the build.

Again, thanks for the tips...
 

Chris Kouba

Supporter
Progress!

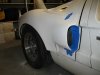
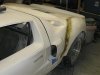
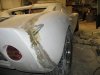
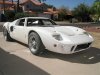
I was waiting like a kid for Christmas morning when some of the parts I've been waiting for arrived last week. The big thing in the box- my flares!

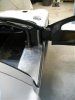
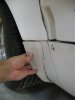
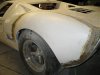
I saw the little flare-lette extensions which Dean made and I liked the look of them. I also saw his pics of "how-to" regarding making them and decided I'd make some too.

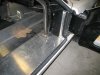
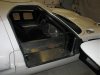
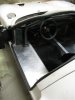
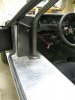
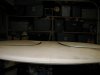
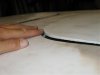
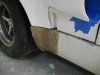
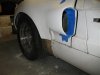
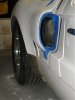
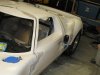
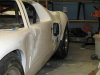
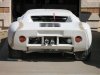
I've been busy over the last couple days to say the least. I have extensions for both sides and with the help of Hersh, we fitted (roughly) the big flare on the passenger side. I will get the driver side roughed in and then trim my extensions to match over the next couple days (I'm in the middle of my work week right now), then Hersh will be back over to help with the glass work.

My skills have improved in an exponential manner, from my first embarassing attempt to make a seat (didn't go well) to this most recent endeavor where I actually came up with a useable product, actually two- one for each side. I know John S was wondering about needed skills for building these cars but there's a LOT of info on this forum and it's very easy to ask questions. I do feel like I can eventually figure out how to do anything I need to with the collective wisdom of the group behind me.

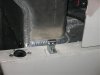
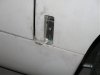
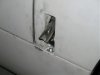
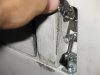
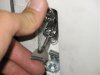
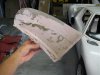
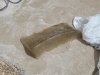
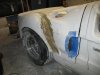
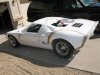
My process started at Target (a US discount store) where I bought some clay and a local parts store where I bought some matt and resin. I made a clay extension, put saran wrap over it, and then took a casting of it with matt and resin. From here I reversed the process, finishing the mold to a somewhat useable surface prep and then bagging it and some matt and resin to try some vacu-forming. This went well for the passenger's side but not the driver's. I re-did the driver's with some high quality car wax as a mold release and it came out fine.

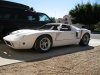
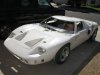
The results are pretty rough, but they can be worked into a finished product that will look great. Just takes time and patience. On with the pics...

Cheers!
 

Attachments

  • step 1.jpg
    step 1.jpg
    29.5 KB · Views: 1,492
  • step 3a.jpg
    step 3a.jpg
    14 KB · Views: 1,409
  • step 5.jpg
    step 5.jpg
    29.2 KB · Views: 1,450
  • step 6.jpg
    step 6.jpg
    37.2 KB · Views: 1,423
  • step 7.jpg
    step 7.jpg
    45.4 KB · Views: 1,417
  • step 7a.jpg
    step 7a.jpg
    52.4 KB · Views: 1,420
  • step 8.jpg
    step 8.jpg
    48.1 KB · Views: 1,422
  • step 9.jpg
    step 9.jpg
    29 KB · Views: 1,405
  • step 9b.jpg
    step 9b.jpg
    21.9 KB · Views: 1,391

Chris Kouba

Supporter
And flares fitted to both sides:
 

Attachments

  • IMG_2041.jpg
    IMG_2041.jpg
    42.4 KB · Views: 1,403
  • IMG_2042.jpg
    IMG_2042.jpg
    37.6 KB · Views: 1,343
  • IMG_2043.jpg
    IMG_2043.jpg
    37.5 KB · Views: 1,448

Chuck

Supporter
Chris:

Nice work! I would say your fiberglass skills have come along very well. Keep the pictures coming!

Chuck
 
Chris K, I could have saved you a lot of time. I have moulds for the Gulf flares and the rocker panel extentions. I've made & sold these parts to Fran Hall. I'm surprised that he doesn't supply these parts with flares. If you used polyester resin for vacu-forming, I'm surprised that the resin cured. Polyester resin need to be open to the air to cure completely.
 
Bill,
the flares that Chris has are 2 inch flares not Gulf flares.....the 2in flares I have did not come from Hough composites...
 
Last edited:

Chris Kouba

Supporter
More progress. Hope to have the flares and extensions mounted by the weekend. Possibly feathered in, but don't want to rush things.
 

Attachments

  • IMG_2044.jpg
    IMG_2044.jpg
    38.5 KB · Views: 1,264
  • IMG_2045.jpg
    IMG_2045.jpg
    39.4 KB · Views: 1,207
  • IMG_2046.jpg
    IMG_2046.jpg
    31.7 KB · Views: 1,135
  • IMG_2047.jpg
    IMG_2047.jpg
    33.5 KB · Views: 1,154
  • IMG_2048.jpg
    IMG_2048.jpg
    35.8 KB · Views: 1,179

Chris Kouba

Supporter
In the light of day for the first time in a while. I love the new look, but I can't help thinking, "Do these flares make my ass look big?"

I'm loving the new look!
 

Attachments

  • IMG_2049.jpg
    IMG_2049.jpg
    65.5 KB · Views: 1,179
  • IMG_2051.jpg
    IMG_2051.jpg
    38.5 KB · Views: 1,146
  • IMG_2053.jpg
    IMG_2053.jpg
    53.4 KB · Views: 1,179
  • IMG_2055.jpg
    IMG_2055.jpg
    39.3 KB · Views: 1,263
  • IMG_2057.jpg
    IMG_2057.jpg
    46.3 KB · Views: 1,151
Last edited:
She's looking very pretty Chris,
I'm a fan of the Gulf flares and have them on mine. The bodywork does take time, but you're over the worst now.
Great progress.
Cheers,:chug:
Martin
 
Back
Top