
- Forums
- GT40 Replica Manufacturers' Corner
- RCR Forum - RCR40/SLC/917/Superlite Aero
- The SLC Clubhouse
You are using an out of date browser. It may not display this or other websites correctly.
You should upgrade or use an alternative browser.
You should upgrade or use an alternative browser.
Rumbles SLC Build
- Thread starter rumbles
- Start date
-
- Tags
- g50 gear ls3 powernation rumbles slc superlight yellow
The padding is thin (as I requested) but quite comfortable, since the gentleman seat is pretty well contoured to start with. Its kinda like sitting in a baseball glove.
There is not a lot of headroom in the SLC. No mater what seat you use, you will need thinner padding to keep from hitting your head.
I mounted my seat as low as possible, with only about 1/2" between the floor and the seat bottom. I'm 5'10" and I have a little headroom to play with, but not much.
There is not a lot of headroom in the SLC. No mater what seat you use, you will need thinner padding to keep from hitting your head.
I mounted my seat as low as possible, with only about 1/2" between the floor and the seat bottom. I'm 5'10" and I have a little headroom to play with, but not much.
Bill, very classy, very clean euro look; nice job! :chug:
From the pictures, the seats don’t appear to have much padding….how comfortable are they?
Jim<?xml:namespace prefix = "o" ns = "urn:schemas-microsoft-com<img src=" /><o></o
wow. totally awesome.
I would definitely drive that car naked with those seats. With a hot momma too...Sorry Fran, no rides for you
Looks bloody awesome Bill!
How do you find entry and exit with that handbrake next to the drivers seat? I find i need that space to make the process easier.
cheers
Stuart
How do you find entry and exit with that handbrake next to the drivers seat? I find i need that space to make the process easier.
cheers
Stuart
There are two different ways to get in and out of the SLC driver's seat:
- Step in with the left foot first: This works for entry, but I get my legs tangled into a pretzel when I try to get out using this method. It usually ends badly with me falling on the ground like a cockroach that is stuck on its back with its legs flailing in the air.
- Sit and spin: Sit on the side pod, pivot on your butt to rotate your legs in and then lower yourself into the seat. Then reverse the steps to get out, for a much more graceful exit. This is the method I use, and the e-brake is low enough so its not in the way at all.
Looks bloody awesome Bill!
How do you find entry and exit with that handbrake next to the drivers seat? I find i need that space to make the process easier.
cheers
Stuart
Last edited:
Wow! Very impressive. Thank you very much for sharing.
I am so impressed. The SLC interior was the one thing we really need to make it to that next level for high end cars and Bill's car has done it. Inspiration for sure and thanks for sharing.
Wow is all I can say. That is stunning! I have leather envy.
Damn!
I know what I'm having my interior guy do!
I know what I'm having my interior guy do!
Looks Great! I'm a big fan of the seat design especially-congrats!
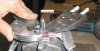
Here's a small detail that makes a big difference in the doors.
The gas shock end hits the lower door bracket when fully extended. If you grind down most of the interfering part of the bracket, the door will extend significantly further up. Just a 1/2" of additional hinge arm movement near the pivot point translates into significant movement at the end of the door. That makes it much easier to get in and out of the car.
Its important to leave a little of the bracket as a positive limit stop. Otherwise, the gas spring might punch thru and damage the fiberglass door jam.
Attachments
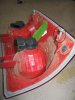
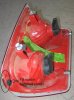
I'm in final bodywork and paint now, so I've been disassembling the body components, and the tail lights needed a little TLC.
- The screws in the horizontal plastic mounting tabs were stripping out and/or splitting the plastic anchors apart. I used safety wire to prevent the plastic anchors from expanding and splitting. I used epoxy to fill the plastic anchors that had split and re-drilled them.
- I replaced the vertical anchors with 1/4-20 nutplates for a more secure mount.
- To fit the Dakota tail lights to the SLC, you need to trim the outside upper corner. That leaves a void where water could enter. I just used some epoxy to seal the hole.
- If any water does get into the light fixture, I drilled weep holes into the bottom of each lens. The bottom of the inboard reverse light cannot be accessed, so I drilled thru the bottom to get to it. These holes are not visible once the tail light valance is in place.
- I added a label to each light fixture with the electrical connections. I had been told that the Dorman RNB-85885 Tail Lamp connector would fit the tail light. I ordered them and they did not fit. Does anyone have the correct part number for the Dakota Tail Lamp connector?
Attachments
Ken Roberts
Supporter
I used two of these kits to get the needed 4 connectors. Hopkins 42205. The rest of the hardware in the kits can be discarded.
[ame="http://www.amazon.com/Hopkins-42205-1991-1995-2004-2008-2007-2008/dp/B0002Q7ZFU"]Amazon.com: Hopkins 42205 Plug-In Simple Wiring Kit for Dodge Minivans 1991-1995/Dakota 2004-2008/Ram 2007-2008: Automotive[/ame]
[ame="http://www.amazon.com/Hopkins-42205-1991-1995-2004-2008-2007-2008/dp/B0002Q7ZFU"]Amazon.com: Hopkins 42205 Plug-In Simple Wiring Kit for Dodge Minivans 1991-1995/Dakota 2004-2008/Ram 2007-2008: Automotive[/ame]
Last edited:
Howard Jones
Supporter
Nicest interior so far.................IMHO
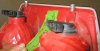
Each time I work on a particular part of my SLC, I try to make it easier to do that task the next time.
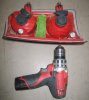
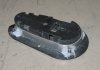
As I disassemble the body for paint, I had to remove the front clam latches. Removing/installing the front clam latches are one of the most difficult tasks on the entire SLC, particularly when the body is mounted on the chassis. It takes a contortionist reach from under the car to even get to the backside of the latch. And then the tiny mounting nuts are sandwiched in a small sliver of space between the latch and the fiberglass body. That small sliver of space is nearly to small to get a socket or wrench on the nuts...Argggg!
To make this task much easier, I fabricated a simple nut plate that I can hold in place by sticking my fingers thru the latch hole on top. Its just a scrap piece of .040" aluminum sheet that is bent tightly around the nuts and some epoxy to hold the nuts firmly. After this photo, I cleaned up the epoxy and painted the nut plate black, since it can be seen thru the latch hole on top.
There is no need for these nut plates on the rear latches, because they are easy to reach.
Attachments
Last edited:
It's been a while since I checked in on your build and I was surprised to see the interior done.
Fantastic looking, congrats :thumbsup:
I like the integration work on the center console, that really makes for a nice flow. Like the surrounds behind the seats too....
Hell, I like it all !
I had planned some storage boxes beside the seats as well, could you post some finished detail shots of those? Thanks.
I too noted the bottom of the door trim panels have minimal clearance to door sill. This is understandable as I don't think there was intent to even have door panels when the body mould was made, therefore no designed in clearance.
I was thinking I'd clearance a little off the sill to help out in this respect. Did you end up with enough clearance in the end or should I shave the top of the sill?
Last edited:
Similar threads
- Replies
- 26
- Views
- 8K
- Replies
- 7
- Views
- 6K
- Replies
- 4
- Views
- 10K