
- Forums
- GT40 Replica Manufacturers' Corner
- RCR Forum - RCR40/SLC/917/Superlite Aero
- The SLC Clubhouse
You are using an out of date browser. It may not display this or other websites correctly.
You should upgrade or use an alternative browser.
You should upgrade or use an alternative browser.
Rumbles SLC Build
- Thread starter rumbles
- Start date
-
- Tags
- g50 gear ls3 powernation rumbles slc superlight yellow
The car looks great! Excellent fit and finish, and too bad it rained so you couldn't display your great interior!
Hope your sealing worked...I drove mine yesterday and got caught out in the rain. Still a dry interior, and other than a bit of cleaning, no apparent effects. I think I will add some more to direct the water so it flows exactly where I would like it.
Hope your sealing worked...I drove mine yesterday and got caught out in the rain. Still a dry interior, and other than a bit of cleaning, no apparent effects. I think I will add some more to direct the water so it flows exactly where I would like it.
The black top section is exactly what I image for mine! Beautiful car.
Bill,
Congratulations... What a beautiful car! I too love the black top also. I also like how you have the side windows placed without screws. How did you make that happen?
Congratulations... What a beautiful car! I too love the black top also. I also like how you have the side windows placed without screws. How did you make that happen?
Bill,
In addition to the side window install, I had another question. In your body prep and in the pics of your finished car, I noticed you didn't have a rear diffuser in place. I was thinking of making my diffuser removable so I could get the rear bonnet open completely. Is that what you are doing too?
In addition to the side window install, I had another question. In your body prep and in the pics of your finished car, I noticed you didn't have a rear diffuser in place. I was thinking of making my diffuser removable so I could get the rear bonnet open completely. Is that what you are doing too?
When I had professional installers put my windshield in, I asked how they would install my lexan windows. They recommended "1/4 3M Windo-Weld". Its a narrow urethane ribbon that is very sticky and quite easy to use. Look it up on Youtube for demonstrations. You will need 2 "kits". Its available at your local NAPA.Bill,
Congratulations... What a beautiful car! I too love the black top also. I also like how you have the side windows placed without screws. How did you make that happen?
The aft portion of the rear window doesn't lay flat to the clam flange of the clam, so I fabricated 3 very small clamps that are barely noticeable that hold the lexan close to the flange.
Last edited:
Bill,
In addition to the side window install, I had another question. In your body prep and in the pics of your finished car, I noticed you didn't have a rear diffuser in place. I was thinking of making my diffuser removable so I could get the rear bonnet open completely. Is that what you are doing too?
The PIC is a little dark under the car and its hard to see, but if you look close the rear diffuser is installed. Way back I got all medieval, grabbed a saw and cut my diffuser out of the rear clam. I trimmed the bumper portion of it off and re-mounted it about 2" further forward.
I always thought that the diffuser stuck out too far, so this change really tightens up the way the rear looks. It also allows the rear clam to tip much further rearward.
A bonus is that the separate diffuser piece can be easily removed when you need to work on the rear of your transaxle.
Attachments
Last edited:
TY Bill
Bill- Ty for your input. I am currently modifying my bodywork for my front and side windows. I have never liked how the side window is exposed on the leading edge at the front of the door. I am reducing the width of the window edge at the front of my side window and adding fiberglass so that the leading edge of the door is fiberglass- not the window. I am also customizing the fiberglass on the pillars for the front windshield fit. With that in mind...
It looks like you painted your windows to create the look at the edges. Is that correct? Any special prep for that paint application?
It looks like you painted your windows to create the look at the edges. Is that correct? Any special prep for that paint application?
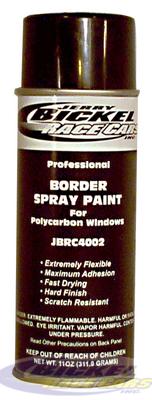
Yes, I painted the borders of the side and rear windows. Its difficult to get regular paint to adhere to the lexan so I used -> Jerry Bickle paint for use on polycarbonate windowsBill- Ty for your input. I am currently modifying my bodywork for my front and side windows. I have never liked how the side window is exposed on the leading edge at the front of the door. I am reducing the width of the window edge at the front of my side window and adding fiberglass so that the leading edge of the door is fiberglass- not the window. I am also customizing the fiberglass on the pillars for the front windshield fit. With that in mind...
It looks like you painted your windows to create the look at the edges. Is that correct? Any special prep for that paint application?
Very nice color scheme and I'm not usually a yellow car fan.
Are you intending to leave off the headlight covers? It doesn't look bad that way, just curious as it seems everyone else uses them.
I decided to omit the lexan headlight covers and smooth out the cover outline in the body. It gives the front end a Pagani Huayra look.
Attachments
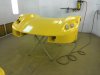
I decided to omit the lexan headlight covers and smooth out the cover outline in the body. It gives the front end a Pagani Huayra look.
I'd be more worried about rocks and other crap flying up and hitting the lights. Them lights be mighty pricey.
^ True. I would put some 3m clear bra over the lenses. Would atleast get a touch of protection.
Another idea could be to cut some acrylic or polycarbonate to fit at the same angle as the openings to cover them. Like the headlight covers they made for the 70's-80's camaros that just fit the hole itself and flushed them out.
Another idea could be to cut some acrylic or polycarbonate to fit at the same angle as the openings to cover them. Like the headlight covers they made for the 70's-80's camaros that just fit the hole itself and flushed them out.
Here's the official photos form the Charlotte AutoFair awards ceremony.
You might recognize Mike Joy from the Velocity Channel on the right.
The Charlotte Motor Speedway mascot "Lug Nut" is in the middle:laugh:
You might recognize Mike Joy from the Velocity Channel on the right.
The Charlotte Motor Speedway mascot "Lug Nut" is in the middle:laugh:
Attachments


Similar threads
- Replies
- 26
- Views
- 8K
- Replies
- 7
- Views
- 6K
- Replies
- 4
- Views
- 10K