
You are using an out of date browser. It may not display this or other websites correctly.
You should upgrade or use an alternative browser.
You should upgrade or use an alternative browser.
SteveB MDA MKII Build Diary
- Thread starter SteveBarker
- Start date
Dave Collins
Supporter
Steve,
Congratulations on the pass, I look forward to seeing the car on the road after all your hard work.
Dave
Congratulations on the pass, I look forward to seeing the car on the road after all your hard work.
Dave
Mike Pass
Supporter
Congratulations Steve! Really glad you have got it through after so much hard work. I can't wait to see it howling down the road. All we need is some good weather to give the cars a bit of exercise. You must be so pleased with the result of your considerable efforts. A beautiful car and a credit to your craftmanship.
Cheers
Mike
Cheers
Mike
Paul Thompson 'Hooligan'
Admin
Well done Steve! - An achievement indeed and payback for all the hard work and dedication you've poured into its creation.
Hard bit done - time for feet up - relax - look upon your handywork and all in anticipation of a hot sunny Summer (hopefully) for miles and miles of fun!!
Congrats again.
Hard bit done - time for feet up - relax - look upon your handywork and all in anticipation of a hot sunny Summer (hopefully) for miles and miles of fun!!
Congrats again.
Thanks for all your good wishes.
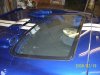
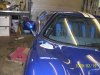
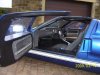
The SVA document was a bit of an anticlimax after all the effort to get it. It just looks like an old type MOT! However now I can refit the proper bits and finish the build. The rear screen is now bonded in and looks very sharp and tidy, The painted roof vent is now in place.
The mirrors had to be extended to get an acceptable position to pass the SVA, the big side/top air intakes created a blind spot that was not easy to see past in the test.
Lights and front indicaters next.
Steve
Attachments
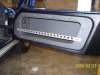
A little more progress with the post SVA details.
I have restored the mirrors to a more conventional height so the door bin panel can now be fitted. I have also made some check strap brackets they are screwed directly into the door pillar behind the dash for a good solid fix.
The VW mirror controls are fitted in the door pocket also the heating switch for the mirrors, I decided to keep this feature to keep the mirrors as clear as possible, hopefully no fogged up mirrors.
Steve
Attachments
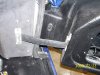
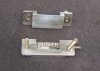
I am changing the hex wheel nuts to spinners and had difficulty removing the nuts that were tight on. This 70mm socket fixed it!:thumbsup:
The registration documents have been taken to the DVLA, I thought that only a percentage of vehicles were inspected; it turns out that all kit and rebuilt cars are inspected before the registration is completed. That was the word from the senior guy at DVLA in Preston Lancs.
Just waiting for the appointment date now. I will have to put the hex nuts back as some engineers object to them.
Steve
Attachments
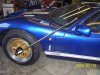
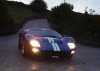
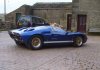
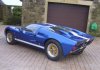
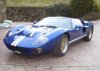
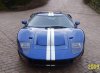
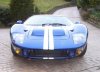
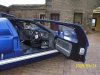
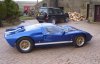
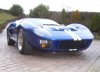
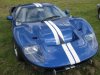
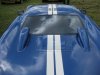
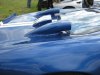
Today I was able to check how the car goes down our access road that has a steep junction with the road, made it down and back without grounding the nose. Here are a few pictures on return.
Steve
Steve
Attachments
-
 pre reg 1.jpg33.7 KB · Views: 511
 -
 pre reg 2.jpg49.7 KB · Views: 532
 -
 pre reg 3.jpg47.5 KB · Views: 551
 -
 pre reg 4.jpg52.3 KB · Views: 532
 -
 pre reg 5.jpg45 KB · Views: 507
 -
 pre reg 6.jpg47.5 KB · Views: 509
 -
 pre reg 10.jpg53 KB · Views: 657
 -
 pre reg 9.jpg48.6 KB · Views: 561
 -
 pre reg 8.jpg47.4 KB · Views: 627
 -
 pre reg 7.jpg45.9 KB · Views: 549
 -
 pre reg 11.jpg47.5 KB · Views: 627
Brett James-McCall
Moderator
Steve,
What are those mirrors again?
Brett
What are those mirrors again?
Brett
Ron McCall
Supporter
Beautiful! Nice job!
Steve
May I add my congratulations to those of everyone else. What a superb effort and you should be proud of the result. I look forward to seeing and hearing it this year at any events we can both get to or possibly in August when I will be in the area visiting family. Enjoy
Chris
May I add my congratulations to those of everyone else. What a superb effort and you should be proud of the result. I look forward to seeing and hearing it this year at any events we can both get to or possibly in August when I will be in the area visiting family. Enjoy
Chris
She looks gorgeous, great job Steve.
Dave
Dave
Great looking car steve
Frank
Frank
Dave Collins
Supporter
Steve,
It was good to meet with you at Stoneleigh and get a chance to see first hand the amazing job you have done on this car build. You should be proud. Attached are a couple of the pictures I took.
Dave
It was good to meet with you at Stoneleigh and get a chance to see first hand the amazing job you have done on this car build. You should be proud. Attached are a couple of the pictures I took.
Dave
Attachments
Thanks everyone for your posts, it's the encouragement help and supportthat gets you through.
The trip has raised some issues that will be next to be sorted.
I think some work on sound deadening will be a must, some carpets that can be easily removed ie just fixed with press-studs should do the trick also a bit of padding in strategic places.
The seats have been made to be taken out easily by just the removal of a couple of 'R' clips so the carpets can be removed easily if they get wet. It rained on the way to Stoneleigh so I know it leaks, bit more work to do there also.
First driving impressions are a bit mixed. It is reassuringly stable and not upset by bumps and undulating roads as my previous KVA was even after lots of work; steering is not heavy and turns in nicely; there is lots of power that I will have to treat with respect. Downside, the 3.7 diff ratio with a paddle clutch plate makes local town driving a bit stressful.
Good job I did not expext it to be right first time
Steve
Dave, thanks for posting your pics of this fantastic car.
there is lots of power that I will have to treat with respect. Downside, the 3.7 diff ratio with a paddle clutch plate makes local town driving a bit stressful.
So it's a bit of an animal then eh Steve, well right on:thumbsup: a job well done. It looks a bit of an animal too which is the way I see the MkII rear clip.
The paintwork looks superb too.
From forum comments on paddle clutches, they can be a bit ott for town driving, maybe experimenting with technique can help, like my Subaru - too little throttle or slightly too much gave some judder, but I found a sweet spot combination of throttle and clutch release that worked fine.
regards
Dave
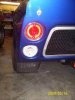
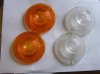
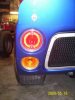
I have been a bit down on the rear lights. The brake and tail lights of the original 'Corvair' are exactly right but the indicator lights for the UK have to be amber, so I had used the matching reverse/backup units but with amber light bulbs.
These work fine but look a bit 'Chav' and modern and also act as a white reflector that I think is not acceptable on regs.
After a lot of dead ends I found some transparent amber paint and airbrush sprayed the inside of the lens.
I think these now look better
Steve
These work fine but look a bit 'Chav' and modern and also act as a white reflector that I think is not acceptable on regs.
After a lot of dead ends I found some transparent amber paint and airbrush sprayed the inside of the lens.
I think these now look better
Steve
Attachments
Similar threads
- Replies
- 23
- Views
- 6K