
You are using an out of date browser. It may not display this or other websites correctly.
You should upgrade or use an alternative browser.
You should upgrade or use an alternative browser.
Nicks Forte Scratch Build - to Stunning Mk1 GTD
- Thread starter Nick Davies
- Start date
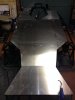
To answer a question I received, the centre Aluminium Alloy which looks different is 16 gauge 6082 T6, the hardest of the 6000 Aluminium alloys. I wanted something really good under our backsides and stiffen the chassis core section. This will also go on top of the tanks and should resist deforming if and when sat on. The front and rear are a modest alloy, noted for plyability and ease to bend. The later will be used exclusively for the internal paneling.
Brett James-McCall
Moderator
Nick, you could stiffen further by swaging lol
Looks great - good progress. I on the other hand have packaging issues and am having to move stuff round behind the dash
Looks great - good progress. I on the other hand have packaging issues and am having to move stuff round behind the dash
Been taking a look at how my 38mm cooling pipes will run the centre section and how they can be suitably supported clearing the front a rear 40mm x 40mm box sections, also the same applies to the Air-Con tubes. In addition, need to leave room for the Handbrake Handle and rearward cables.
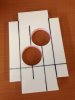
Have taken some 10mm Delrin and modelled the cross section down the centre. Have made three of these, one for front, near centre and one for the back. I've offset the pipes to keep the height at a minimum but looks like I can add passages for the Air-Con pipes to the sides. Slots or holes can be put in later for the HB cables.
If anyone can see if I've overlooked anything ?
Attachments
Hi Nick
I've been thinking about this area recently too...
I'm thinking of lagging the pipes to keep some of the heat out of the cockpit - but this would likely add quite a bit to the space requirements
I might mount the handbrake and gear stick above the tunnel, and box them in separately
I've been thinking about this area recently too...
I'm thinking of lagging the pipes to keep some of the heat out of the cockpit - but this would likely add quite a bit to the space requirements
I might mount the handbrake and gear stick above the tunnel, and box them in separately
James,
I'm going Right hand gear shift so that's one less thing to worry about down the centre.
My Handbrake should arrive on Thursday so I can see if it'll all fit as expected.
My Rear Steel uprights are being supplied in plat pack so I have plenty of other things to pass the time if I need to consider an alternative for the pipes.
Brett James-McCall
Moderator
Where do you plan to run your brake lines / loom etc. Down the sides?
Only other thing you may have forgotten is the bleed line for the radiator
Only other thing you may have forgotten is the bleed line for the radiator
Keith Stafford
Supporter
My brake and clutch lines were down the side, through the chassis members, however they both then jinked out at the front into the footwell and went through the panel around the rack, making them exposed and vulnerable to damage from shoes, would not have passed IVA. They are now down the tunnel. The whole rear area of the tunnel is really cramped, raising it even 10mm would help!
Just to be clear, raising the height of the top of the tunnel frame to give an added 10mm of space within would be on my scratchbuild list of 'improvements'.
Nick, you may want to put thermal insulation around the 38mm pipes, so leaving clearance for that?
K
Just to be clear, raising the height of the top of the tunnel frame to give an added 10mm of space within would be on my scratchbuild list of 'improvements'.
Nick, you may want to put thermal insulation around the 38mm pipes, so leaving clearance for that?
K
Last edited:
Keith Stafford
Supporter
Nick, the other I forgot to say was that I put 3 straps across the floor for the seat to sit on, as 2 flexed slightly. my straps are 6mm x 35mm MS.
As I'm working on the central Tunnel and its contents its brought to mind the issues of front / rear electrics and the like.
I mentioned in my first post that the car would have a few tweeks based on my engineering background.
The battery will be mounted forward with a solid shielded copper bus bar running to the rear for the heavy current carrying requirement of Starter Motor, a lighter bar will carry an additional 12v for the rearward electrics. (I want the battery weight upfront to counter act a little the rearward weight bias).
Excepting the Starter Solenoid control wire, the only other connection front to rear will be a shielded USB2.
The car will be equipped with front and rear micro controllers which will communicate and the car will be essentially run from programming I will write using the arduino open source platform.
Arduino - Products
This gives me endless control over Digital / Analogue inputs and outputs as and when I want to get a little fancy.
This will be my builds "Off Piste" bit - start point will be just getting it to cover the basics, as and when I go EFI, that and the engine management I will not touch !
Keith Stafford
Supporter
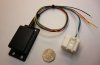
Nick, be interested to see what you come up with. I developed a small uP (PIC) based product to fake speed pulses to the Corsa EPAS system. I also did a uP based latch for the rear fog light, instead of rewiring with a relay. I am presently developing a pulse speed converter, so if you had speed pulses from wheels, speedo or shafts, then this will convert them to the correct pulse rate for the Corsa EPAS mappings.
Attachments
FYI, here is the schematic to connect CANBUS to an arduino - http://fazjaxton.net/products/fazcan/files/FazCan-v2.1-schem.pdf
You'll need a car suitable power supply and to isolate the arduino from car power on the output/input pins too. I used this circuit
http://greatoldone.squarespace.com/storage/lowduino/lowduinosch.png as the basis of mine (which is scrawled on paper otherwise I'd put a copy up).
I was going to design a board and get some made up, the more I get made the cheaper though (and I'm expecting a MOQ of about 10) so shout if you're interested.
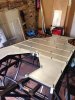
Finally, another milestone. Have spent the last few hours painstakingly taping, measuring, centre punching and then drilling what I think is the best part of 400 4mm holes.
Hope to get the floor in place Saturday so I can again get her right side up. My Pneumatic riveter has arrived so that phase should not be that stressing.
Hope to get the floor in place Saturday so I can again get her right side up. My Pneumatic riveter has arrived so that phase should not be that stressing.
Attachments
Hi Nick,
don't be in any rush to rivet the floor in. You'll find easier to move around the chassis to prep all the other panels etc with it removed
Regards,
Andy
don't be in any rush to rivet the floor in. You'll find easier to move around the chassis to prep all the other panels etc with it removed
Regards,
Andy
Dr. Bob Woods
Supporter
Nick,
I am not going to rivet any panel until I have test fitted everything. The panels will block your access to some parts. Use Clecos to hold the panels in place so you can see where you are.
-Bob Woods
I am not going to rivet any panel until I have test fitted everything. The panels will block your access to some parts. Use Clecos to hold the panels in place so you can see where you are.
-Bob Woods
Similar threads
- Replies
- 17
- Views
- 6K
- Replies
- 22
- Views
- 6K
- Replies
- 6
- Views
- 6K
- Replies
- 7
- Views
- 2K