
You are using an out of date browser. It may not display this or other websites correctly.
You should upgrade or use an alternative browser.
You should upgrade or use an alternative browser.
Rcr 40-31
- Thread starter ckouba
- Start date
Chris Kouba
Supporter
Re: Rcr40-31
It's been a month without an update so here's one...
Mechanically things have been on hold since I got the motor and trans in. I've begun basic bodywork, filling in stuff to make it level and waiting patiently on the cagebuilding. I've learned a little regarding how to work with fiberglass and bondo but I have a LONG way to go. It's a small car but it gets really big really quickly when you have to sand it down.
So far I have rebuilt a portion of the passenger side door where I "over-trimmed" the roof section- I think that's the only section I have to deal with though. I also leveled up a few of the places where it seems everyone is leveling between panels. I still have a few to go and am learning every time I step into the garage.
I tried using the bondo-hair product but didn't like it too much. In the end, I ground it all off and resined on strips of glass, grinding them down and filling the rough spots with filler as needed. I was much more comfortable with this process. It seems to have come out well enough for a rookie and I now need to learn what it'll take to get it to finish quality. Perhaps with a little more time and experience I would have gotten comfortable with the other but I found something which definitely is working.
The cage will go in this week and by next week I should be able to start back into it with my original fervor. I'll be able to coat the chassis (thinking powder coat with an underbody protectant), run wires and plumb the car. I will be taking the drivetrain back out and doing most of the bodywork first though. I am looking forward to getting the flares and mounting them on the car and I talked to Fran today about getting a set of the canards for the nose. Looking forward to getting my hands on all that!
Also, a recent arrival was the 10.5" clutch with the sexy alu flywheel which should give INSTANT throttle response! I can't wait to rumble.
Will post pics when possible.
Are you going to powder coat the chassis black or did you have something else in mind?
Chris Kouba
Supporter
Progress!!!!!
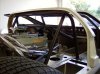
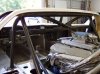
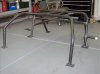
Cage. Check.
Doors close (and open). Check.
Firewall trimmed and reinstalled. Check.
I cannot convey how well the cage matches exactly what I was looking for. We had a good planning session last week to plot out exactly what we were going to do regarding the build. We had the NASA CC&R .pdf pulled up on a laptop and worked our way through the cage, tube by tube, with that. Only had to rebend one tube (front hoop) once. Things went extremely well!
In the end, I think it came out fantastically and should be able to get a NASA logbook (that's just personal opinion at the moment though). Regardless, I'll be happier when I hit the track with it instead of just a hoop. Hopefully it'll never get "used".
Plans now are to finish trimming up the body and then strip it all down to basics and start the build. As I go through it, I can't bring myself to cover up the alu with powder coating, although I think I'll be doing the lizard skin treatment on the interior and some sort of bedliner treatment on the underside. At about this point I keep coming back to doing the black like Ron McCall's, as I think that looks GREAT. We'll see in the end what I do, but I know I have to strip it down and get it ready.
Once I get through that it'll all need to come back together. There is one complication coming up though. I have a sabbatical coming up in June and will be taking some vacation on top of that- to the tune of 11 weeks. I seriously debated working on the car through it but in the end will be going climbing for a large portion of it . I'll be around here a little longer but mid-June through start of Sept, I'll be on the road. I'll probably end up posting some trip reports (like THIS ONE of last summer) from the road to bore you all with.
Anyway, on with the pics!
And PS - It was SOOOOO cool when I closed the doors for the first time and they went, "click" and were shut! These small victories are incredibly rewarding.
Attachments
-
 HPIM0023.jpg59.9 KB · Views: 2,100
 -
 HPIM0024.jpg43.2 KB · Views: 2,087
 -
 HPIM0026.jpg57.9 KB · Views: 2,639
 -
 HPIM0027.jpg67.6 KB · Views: 2,029
 -
 HPIM0028.jpg64.5 KB · Views: 2,020
 -
 HPIM0030.jpg69 KB · Views: 2,094
 -
 HPIM0031.jpg65.4 KB · Views: 2,946
 -
 HPIM0032.jpg56.9 KB · Views: 2,045
 -
 HPIM0033.jpg39.4 KB · Views: 2,005
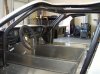
Good pics Chris.. I'm curious if your selection of Water-pump / front cover will allow the installation of the bulkhead in the original location without a "bump" in it..
Also - the bars that extend out from the main hoop that look to be about 8-10" long - what are they?
Also - the bars that extend out from the main hoop that look to be about 8-10" long - what are they?
Ron McCall
Supporter
Good pics Chris.. I'm curious if your selection of Water-pump / front cover will allow the installation of the bulkhead in the original location without a "bump" in it..
Also - the bars that extend out from the main hoop that look to be about 8-10" long - what are they?
I have a ,remote mount,electric pump on mine and have a totally flat bulkhead.It looks like Chris will have to have a small bump on the firewall.
The bars extending out from the side are for the door latch strikers.Very good idea!!!
Chris: The bar is incredible !!! Very well done!! I was curious about the bolts into the fuel tank as well.
Would you want to build another bar?????
")
Chris Kouba
Supporter
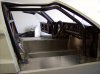
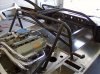
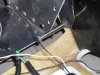
Sandy, et al- I will be running with bladders so I will be bolting in the cage with button head allens and covering them to avoid abrasion between them and the bladder. I have backing plates cut, drilled and chamfered as well and they'll be taped up or something as I'm not interested poking a hole in anything.
Randy- Ron is spot on, the tubes hold the strikers for the door latches. The doors now close firmly. They did move slightly from where they were tacked to the final burned in position. I have to go back and slot the hole a little bit to rectify. I still don't know about the bump, but as Ron predicts I anticipate I'll need some sort of blister for clearance. Things are close but I don't have a pulley set nor do I have accessories mounted either. Time will tell.
Ron- The bends were all modeled with some computer software and the setup was saved. I'd bet I could get a set bent up fairly easily if you're seriously interested (or for anyone else). Front hoop and/or main hoop? I'd assume you can take care of the connectors and harness bars. The front hoop can probably be made to work with Fran's roll bar- I needed a different one due to NASA regs though. I had a few ideas on mounting pads if I didn't have the bladders but opted for them and didn't have to deal with it.
It was a really good few days of progress!
Randy,
the chassis has to be ordered as a fuel bladder chassis as the construction is different.They are not a retrofit.
The bladders are FIA FT3 spec.
Call RCR for more info.
the chassis has to be ordered as a fuel bladder chassis as the construction is different.They are not a retrofit.
The bladders are FIA FT3 spec.
Call RCR for more info.
Chris Kouba
Supporter
Progress has been slow as there are other things brewing in life for the moment, but here's what I've been up to lately.
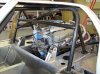
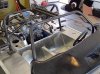
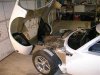
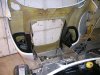
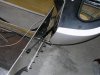
I wanted a hinged front clip. Hersh came over and helped me through it (THANKS Hersh!). It's now hinged and I love it! It's self-supported with a gas strut to stay open as well.
I got in a whole bunch of switches from Del City and have thought about wiring a little.
I got a turn signal switch in (thanks Jonathan!) and have built a little column to mount it on (no pics yet though).
I got some weatherstripping and am going through the door adjustment phase again.
The goods:
Attachments
Man, I like that. Looks like another project for me! What is the part number for the strut?
")
Chris Kouba
Supporter
I started to write a PM for Bill but thought I'd share with everyone. What I did:
The strut - P/N 4646 at Schucks. I tried another one first and it was WAY too strong so I took it back. Try to find one you can move by hand as the clip is nearly balanced and doesn't need much force to stay upright. It can be very short travel (see geometry notes below) and even an older one which is already a little soft would work well.
The hinges - Very simple: found tube which a bolt rotated through and used it. Cut 2 ~3" sections and welded them to flat stock at a 90° angle (think capital "T" and see the pics). To assemble and reassemble conveniently, we figured out the best thing was to have a nut welded to a plate for the receiver side of the hinge (again, see pics). Tighten the bolt into the nut and the whole thing rotates nicely.
The mounting locations - Kind of out in space... It's interesting to see the differences in sides of the body. We chose to mount the T side of the hinges where the bottom of the front pan ties to the sides. The body side of the hinge was another story. The driver's side pivot point is up inside of the body. The passenger side actually sticks down slightly below, due to where we mounted the pivot portion of the hinge. We hand-held the body and rotated it through the motion and kind of guesstimated where the pivot axis should be. In all honesty I need to adjust it a little still, but the panel gaps (base of spider, sill to clip lines) look great. I held it in place with the floor jack at the front and with duct tape at the sills and just eye-balled where the hinges should bolt through the panelling and pre-drilled the holes on the plates as well as making a set of backing plates too. Altogether, very low-tech but effective.
The geometry - With the first strut, there was too much force across the strut and the parts and I couldn't reduce it. I changed the strut to a weaker feeling one and also rearranged where I had it connected. The new geometry does not fully compress the strut so the stress across it and the clip isn't too high when closed (the first one totally fouled the panel alignment). The thing I like the most about it is that it stays up without monkeying around with it and I don't have to worry about it slamming down in a breeze as if it was on a lanyard.
It's all pretty dirt-simple but took a little time and energy to work through. Also, there was a lot of effort behind the short sentence where I said "Hersh came over and helped me through it." Having his car there to, um... "reference" was a very helpful thing, and we spent more time at his house fabbing parts than we did at mine working directly on the car.
I am getting ready for a huge time away from home so the car has been a little neglected lately. I look forward to getting back and getting it running but I am in for the summer of a lifetime and focusing on that for now.
And Tim, I am counting the hours til my freedom!!! (starts 6/6 at 0600, but I won't be in the neighborhood til the dates we talked about).
Thanks sooooooooooooooo much Chris. This is very valuable information to other RCR builders. I've printed it out and will be sure to documant the details on my build site for others to benefit from. I'll be sure to give you all the credit as you did the hard job - the R&D.
Say "Hi" to Hersh for me.
Cheers
Bill
Say "Hi" to Hersh for me.
Cheers
Bill
Chris Kouba
Supporter
A little edit is needed, it was P/N 4643, fuzzy memory but just confirmed it.
I'll go back and see if I can edit the other post.
CK
edit: nope, can't do it so the original post has the incorrect #.
I'll go back and see if I can edit the other post.
CK
edit: nope, can't do it so the original post has the incorrect #.
Re: Rcr40-31
I read Chris has his sabbatical, but can anyone explain this to me? I can't imagine you have to cut pieces form the chassis to make an engine fit, do you?
John
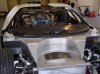
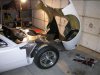
With the motor and trans connected and hanging there on the hoist...
It was a great feeling after the many trial fits and re-fits. I didn't want to cut too much from the chassis to make it fit and have a huge hole. I now need a starter to ensure it's all good.
...
I read Chris has his sabbatical, but can anyone explain this to me? I can't imagine you have to cut pieces form the chassis to make an engine fit, do you?
John