Rcr 40-31

Chris Forgot this.
My expansion tank was made by SGT but it has the following outlets

All Three are -6 outlets :
1. bottom of expansion tank to water pump
2. near top of expansion tank to manifold
3. top of expansion tank to radiator top (air bleed ), this should be no more than 3-4mm int. diameter I have been told.

4. overflow hose in tube to radiator cap.
Others may differ ?
 

Chuck

Supporter
Chris

Tom has a good memory. I did use a reducer. Noted on a later post. Guess I need to figure out a way to amend the old posts.

Seems that sometimes what should work doesn't and what shouldn't work does. 3/8 may be too big but you can always add a reducer later on. As I recall that was 3/8 outside so the inside diameter was less. Indeed when I rearranged the hosing some months ago I left off the spacer. Still works just fine.

Tom's discussion about the cooling systems on another thread is excellent. Lots of good information. You probably saw it. After reading it I wonder why our set up works at all. But it seems to work just fine with over 3500 miles as of this weekend. Temp holds steady summer or winter. Drove it 80 miles yesterday. The heater worked nice and steady. No issues.

Couple of observations.

1. Make sure the top of that tank is the high point in the coolant system.

2. It takes time to purge the system. I am convinced even with all the little tricks it will take several run cycles to purge the system, including the heater. Patience.

3. Drill a small hole in the thermostat, position it up. So there will be a little bit of flow even when it is closed.

So my thought is to carry on, and be prepared to make adjustments when it is all together. That tank is an impressive piece of work.

Keep the posts coming.
 

Chris Kouba

Supporter
Thanks Chuck, I will work up a reducer. I am having an interesting time thinking up why and how it works as well, but if yours and Toms are clearly working well, I certainly won't reinvent the wheel.

A further question- what temp thermostat should I run? I currently have a 195°. Is this too hot?
 

Chuck

Supporter
Chris

I am using a 180 degree thermostat.

Use a radiator fan switch that goes on at 200 degrees and off at 180. The lower temp switch wil just run all the time.

Use a 13 pound radiator cap on the expansion tank. No good reason to use a higher pound / pressure cap.

Don't be in a big hurry to come up with a reducer. I removed the reducer and mine is doing just fine.

It can be hard to wrap ones head around the path coolant follows in the GT. But it is a long path from the engine to the radiator. That hole in the thermostat and that purge line will let some flow when the thermostat is closed. That means it may take a bit longer to come up to operating temp, but my experience is that the temperature holds in a tighter range.

I suspect that there are always variations in what works best in each application. I know I switched fan thermostats, added then later removed the reducer, added the recovery tank, added the 1/8 hole to the thermostat, all on the path to a consistent and reliable system. Put your system together and make the refinements that will work in your particular application.

Lots more details in the book I sent . . . .

Chuck
 

Chris Kouba

Supporter
Thanks again Chuck, you've been of great assistance.

I've spent a bit more time on the tank and have finished it up, with the exception of the roll cage mounts. I started to machine something but I couldn't get the results I want. I will be ordering some (some might say "cheating") and welding them on when they get here. I am over it though as it will definitely look good enough for me.

I've also been spending lots of quality time with wiring. I think I finally have a reasonable understanding of what I need to do to breathe life into the motor. The alternator, battery and starter are the "only" things left.

On an exciting note, I had a power supply hooked up to the car and knocked through a milestone yesterday. Turned on the key, ignition went on and the EFI computer lit up, with a few solenoids clicking and the RPM display showing when I spun the dizzy by hand. It was a very rewarding moment.

I honestly probably don't have too much to do to get the thing running but it'll still take me a while anyway.

Finished tank pics to follow...
 

Chris Kouba

Supporter
Tank pics, approximately in place and resting on wood scraps until the clamps arrive:

DSCF0696%25255B1%25255D.jpg


DSCF0699.jpg
 
Fits good Chris,

i wonder if the high oil filler neck will clear the rear clip ? Probably not without shortening it or cutting out the rear clip
 

Chris Kouba

Supporter
Thanks for thinking about it Tom but it clears. I've had the rear clip on with the motor installed and no issues. That's how it was transported and sat for the months between PHX and PDX.

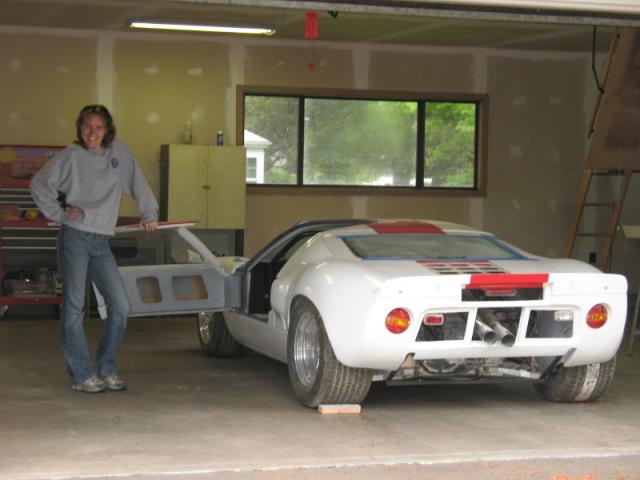
Gratuitous good looking shot of car with drivetrain installed under rear clip:
IMG_5468.jpg


Need to level that tail light though...
 

Randy V

Moderator-Admin
Staff member
Admin
Lifetime Supporter
Man that things runs NICE!!!! Congratulations Chris!!!! :pepper: :pepper: :pepper:
 

Chris Kouba

Supporter
Thanks gentlemen.

Actually, thanks to a number of people but specifically to Chuck, who has been a most patient and supportive resource. I truly would not have gotten to where I am currently without him answering my incessant questions. Thank you kindly again!

As for the motor, the video clip doesn't sound too bad- but in real life, IT SOUNDS AWESOME! It's similar to all the others I've heard, but IT'S MINE!!

Chris
 
Chris,

I have followed your build for a long time now, I dont post very often but having just "heard" your project I had to post and tell you how seriously impressed I am with your build.

I felt your pain with the paint reaction - I had the same with a Porsche restoration 16 years ago so I new exactly what your feelings were. (I still have LIL4399 - the cars registration plate) after all this time.

I have wanted to build a GT40 for my entire adult life, I have read many builds but yours has given me the final impetus andI have put a date on the calender by when I must have the project started.

Thank you (though there may be times when I curse you) for the motivation and congratulations on the build so far, the car running is SUCH a milestone.

I will watch your future uploads with great anticipation.

Ian
 

Bill Hara

Old Hand
GT40s Supporter
Awesome work Chris, always good hearing another car come alive!
You should rightlfully be proud of your efforts, noone can take them away from you!

Cheers

Bill
 

Chris Kouba

Supporter
Gentlemen,

Thank you for your kind words. I am proud of the accomplishment(s) and while I have been the one doing the work, there were times at which I would have been lost without the forum. It's been a group effort.

As for now, I've gotten fuel cells installed- HUGE task, fuel onboard without incident (the videos you've seen had the motor running off a jerry can), shifter sorted so I can select all 5 forward speeds and 1 reverse gear, brake and clutch cylinders filled and bled, although I will likely give them a little more attention before actually driving, and that's about it. The chassis sits just about ready to drive.

The last remaining step is halfshafts. I went to install them Fri eve and they were too short. Turns out I got the standard width shafts and needed the longer ones for the +2 suspension and flares. I got a hold of Fran Mon morning and am waiting to hear back on a pair to swap for.

I am THAT close to finally having a running vehicle!

Hopefully it will be mostly downhill from here. I still have plenty to do like finish the other wiring stuff (lights, wiper, heater, etc), AC to think about, door hardware to finish, carpets, lots of little things... But the end is in sight at this point. It's a great feeling!
 

Chris Kouba

Supporter
Bled and cycled the cooling system today after finally getting to do the cam break in (it was very difficult to restrain myself only running the motor for very brief intervals). I have an adjustable trigger for turning them on and it's kicks in around 195° according to the EFI handheld display. It cycles nicely and shuts them off in the high 170°'s. Ran it for an hour or so in total, no issues. Another small victory for now, we'll see what happens when it's in motion.

Also, another big step- literally. Stepped gingerly on the clutch pedal with the motor running. I selected first gear. No expensive crunching noises... No noises at all actually. Well, none which could be heard over the motor.

I slowly released the clutch pedal... and watched the output flanges of the trans start to spin!

I worked my way through all the gears. It was magical. No bad noises, no issues. I wasn't able to select reverse, so I will have to look into that.

After 5 years, I am two halfshafts away from having a vehicle which can move under its own power! They were supposed to be at RCR Fri and should ship to me on Mon. Looking forward to that!

All the best,
 

Chris Kouba

Supporter
More good news- MOVEMENT!!!

Five years in the making, it can now move under its own power:

MVI 4859 - YouTube

Halfshafts showed up 10m before I had to go to work. Got home and within the hour, car was mobile. Time to actually clear all the tools out of the chassis and tie down all the loose things... And wait for a bit of dry weather!

I now have a legitmate vehicle! And man does it sound GOOD!

All the best to the gang,
Chris
 
Back
Top