
- Forums
- GT40 Replica Manufacturers' Corner
- RCR Forum - RCR40/SLC/917/Superlite Aero
- The SLC Clubhouse
You are using an out of date browser. It may not display this or other websites correctly.
You should upgrade or use an alternative browser.
You should upgrade or use an alternative browser.
Rumbles SLC Build
- Thread starter rumbles
- Start date
-
- Tags
- g50 gear ls3 powernation rumbles slc superlight yellow
Ken Roberts
Supporter
He is using the nose area for luggage. The rad is in the engine compartment.
I will be using the area in front for a trunk, and moved to a custom radiator back in the engine compartment. I want to maximize the trunk area, so I used the wasted space in the very deep footwell instead.
Hopefully your passengers don't have long legs =)
The footwell is so deep, you can't even touch it with your tip-toes. Why not use that space for the lift pump and other things...which brings me to my next post
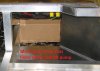
The fellows down in Rumbles Skunk-Works have been at it again. They saw all that extra space in the footwell and decided to fill it with the AC/Heater unit.
The Hurricane 1100 is smaller than the VintageAir unit and it features a electronically actuated defrost plenum, as well as a heater bypass servo valve (vs cutoff valve). It fits great up against the forward wall of the footwell and is only 8" wide so there is lots of legroom left. There's plenty of room to access the suspension bolts as well.
The Hurricane 1100 comes it 2 parts, condenser/fan and the defrost plenum. I mounted the condenser/fan in the footwell and plan to mount the defrost plenum under the fiberglass dash panel.
In the PICs you can see the mockup of the panel that will cover the HVAC and list pump.
Attachments

Last edited:
Love the use of the extra room in the footwell.
Have you thought about installing that plate at an angel for use as a foot rest?
Have you thought about installing that plate at an angel for use as a foot rest?
I finished my front suspension.
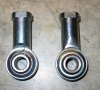
At normal ride height, my steering was binding. The problem was that the shoulder on the steering rod end was hitting the spindle carrier. I ground down just a little of the shoulder to fix the problem. Care needs to be taken here to not weaken the rod end.
I then removed the coil from the shock and ran the suspension thru the full travel of the shock. When steering straight, there was no other binding in the suspension or steering. However, there was significant binding in the steering when turning left/right.
The problem was that the steering rod end was hitting the shoulder on the misalignment spacer. I looked online for misalignment spacers without the shoulder but there were none. I considered a "High Misalignment" spacer, but they are thicker and that would change the suspension geometry.
I ended up grinding the shoulder off the misalignment spacers. Using the round edge of a grinding wheel, it is possible to grind a concave shape into the spacer. It is important that you don't grind any of the flat faces, since that will effect their strength. This fixed the binding in all but the most extreme steering angle at the most extreme suspension travel.
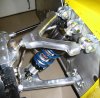
While working on the these modifications, I noticed that the bolt that holds the top A-arm rod end to the spindle was coming loose. I tried tightening it several times, but it still was coming loose when steering. There aren't a lot of threads on the bottom of the bolt, so I made a narrow lock nut by cutting another cut in half. The lock nut approach seems to holding it secure now.
The finishing touch was sanding off the CNC machining ridge lines off both A-arms and then polishing them up to be the wheel well jewelry that they are!
At normal ride height, my steering was binding. The problem was that the shoulder on the steering rod end was hitting the spindle carrier. I ground down just a little of the shoulder to fix the problem. Care needs to be taken here to not weaken the rod end.
I then removed the coil from the shock and ran the suspension thru the full travel of the shock. When steering straight, there was no other binding in the suspension or steering. However, there was significant binding in the steering when turning left/right.
The problem was that the steering rod end was hitting the shoulder on the misalignment spacer. I looked online for misalignment spacers without the shoulder but there were none. I considered a "High Misalignment" spacer, but they are thicker and that would change the suspension geometry.
I ended up grinding the shoulder off the misalignment spacers. Using the round edge of a grinding wheel, it is possible to grind a concave shape into the spacer. It is important that you don't grind any of the flat faces, since that will effect their strength. This fixed the binding in all but the most extreme steering angle at the most extreme suspension travel.
While working on the these modifications, I noticed that the bolt that holds the top A-arm rod end to the spindle was coming loose. I tried tightening it several times, but it still was coming loose when steering. There aren't a lot of threads on the bottom of the bolt, so I made a narrow lock nut by cutting another cut in half. The lock nut approach seems to holding it secure now.
The finishing touch was sanding off the CNC machining ridge lines off both A-arms and then polishing them up to be the wheel well jewelry that they are!
Attachments

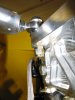
I finished installing my front lift system. I mounted the lift rams on top of the coil springs so they don't move and to reduce un-sprung weight. The inside diameter of ram has a sharp edge while the coil over retainer cap has a rounded edge treatment. The result is that the coil over retainer cap doesn't quite fit flat against the ram. Fortunately, the Ram is made of aluminum, so its easy to mill. I used my trusty old wood router with a 1/4" round-over bit and guide bearing to round off the ram edge. Just be careful to take off only a very thin slice at a time.
.
I had also done the "ram-lift-on-top-of-spring" - mainly for the fixed position ram benefit. The parts fit fine together if you assemble it with the ram on the bottom as you have seen on many of Fran's builds. Problem only occurs with the ram on top. The upper spring retainer has a radius that is meant to nest on the radius on the inside of a spring, not a square shoulder ram. I chose to lathe the radius off the spring retainer.
..... I may have to polish my suspension arms....that looks pretty good.
Excellent thread
There aren't a lot of threads on the bottom of the bolt, so I made a narrow lock nut by cutting another cut in half. The lock nut approach seems to holding it secure now.
Use a low profile stouver (gr 8 metal locking nut)
What is a "low profile stouver (gr 8 metal locking nut)"?
Stovers are metal lock nuts, single use, stronger grade than nylocks.
e.g.,
http://imageserv11.team-logic.com/store-logic/products/159/56769/tn_stover_nut.jpg
Most of them are low profile by default (i.e., lower in height than a nylock, typically around the height of a regular hex nut)
The Hurricane 1100 is smaller than the VintageAir unit and it features a electronically actuated defrost plenum, as well as a heater bypass servo valve (vs cutoff valve). It fits great up against the forward wall of the footwell and is only 8" wide so there is lots of legroom left. There's plenty of room to access the suspension bolts as well.
The Hurricane 1100 comes it 2 parts, condenser/fan and the defrost plenum. I mounted the condenser/fan in the footwell and plan to mount the defrost plenum under the fiberglass dash panel.
Another nice installment via the skunk works. I really like that AC unit, has some nice features and fits up in the front of the foorbox pretty well in the pictures. Kind'a wish I had new about this when I did mine, but then I could have not put the battery and the pump in the same place you have your stuff.
Where do you stand on the engine radiator placement? Are you leaving it be for now?
You might want to consider safety wiring all the suspension and brake bolts. Nylock is useless around high heat, stovers are way better, safety wire the best.
Ahhh, In fact I swapped some nylock nuts for narrower Stovers lock nuts in the rear suspension. I just hadn't heard them called that name before. I'll post more on that tomorrow.
The radiator will remain on the passenger side of the engine compartment. Road testing will show whether it was a brilliant or crazy idea:rolleyes2:
A word on battery safety: All lead acid battery's can emit poisonous sulfuric gas when charged or discharged quickly (even the sealed type). The SLC's windows are fixed and there is no positive venting system, so be careful about putting a battery in the cabin.
If your cloths begin to rot and fall off, you might want to open the door to get some air.:uhoh2:
Last edited:
Ken Roberts
Supporter
Takes a special kind of stupid to put a battery inside the cockpit :lipsrsealed::lipsrsealed:
C6 ZR1, Z06 and a lot of other Corvettes like my 1980 have them in the passenger compartment.
C6 ZR1, Z06 and a lot of other Corvettes like my 1980 have them in the passenger compartment.
not Phsyically inside the cabin though? I'm assuming he meant stickign the battery like in the passenger footwell infront of the person's feet. :/
Similar threads
- Replies
- 26
- Views
- 8K
- Replies
- 7
- Views
- 6K
- Replies
- 4
- Views
- 10K