1149 Mono Replica

Jim Rosenthal

Supporter
Boy, do I hope so. I have to say, since Ron McCall began working on it, things have moved along better than ever.

If anyone is interested to see photos of the interior we are going to try to copy, look on Collector Cars: Significant Muscle, Exotic, Sports and Historic Race Cars at Colin's Classic Auto in his Private Collection area and scroll through the photos of 1043. As far as I can determine, the interior in that car was installed at the factory in the UK back in the sixties. It doesn't look much like other GT40 interiors as far as the seats go, but everything else is pretty much the same.

Fran, here we are nearly eight years later. I had hair then, I think. I have pulled it all out now in connection with this project. Well, Foyt was bald by 1967 and he won, didn't he? All I have to do is finish the car and drive it.
 
That is a very nice interior. Thanks for posting the link.
On another subject, the original 40's had very flowing, large radius bends in their "bundle of snakes" exhaust systems, which looks correct for gas flow. The contemporary exhaust manufacturers here in Australia tend to have very crisp, sharp, layouts of straights and tight 90 degree bends, which appears worse for gas flow. This may be spatially necessary on the larger engines to fit it all in (eg. 4.6 and 5.4 quad cams) but isn't on others. But then what do we know, we can't even win at cricket!!
 

Jim Rosenthal

Supporter
I think his headers have better bends than mine do... looks like an original sand-bent set. Mine are welded up, very well done but not made the same way as 1960s headers. Hopefully they will sound similar...
 

Jim Rosenthal

Supporter
Not much new to report, but some nice items in the pipeline... seat webbing hooks on the way from UK (thanks for the link), rivets on the way, from another Forum member who had them and the tool to put them in with, and lots of sheet metal items coming next week from John Shriver- the carburetor tray/cover, the front sheetmetal paneling, and later on the shifter cover and a mount for the overflow tank. I am ordering new rear tires soon. There is a fairly good chance I can have the seat backs at the trimmers' this week to get those canvas panels made up and laced in, if we can get the grommets installed. If those things are done, and the trampolines made up and installed, the car will be ready to have the real interior made up. And then I can get those huge rolls of leather that have been sitting around here since last year out of the house and into the car.... I'm slowly getting my house back, reclaiming the parts of it that have been a GT40 parts bin. Other folks have it worse off, I suspect- from what they tell me they've collected, they must be sleeping in the bathtub.
 

Jim Rosenthal

Supporter
Spent some time at Ron's today and helped him get some things done. The front sheet metal parts are all in place, riveted in, and fit beautifully. These were made up by John Shriver from templates we cut a week or so ago. What was surprising is that the templates were nearly identical for the right and left sides of the car... who would have thought that? John also made up a very fine carburetor shield for the Webers, with standoffs, which we set in place today as well. Looks terrific; that will get powdercoated and installed again within a few days. Ron is also working on the routing for the emergency brake cable- this required a union with the two caliper cables and then one cable which runs into the passenger space on top of the tunnel. We may order the ca ble from Midwest Control unless the throttle cable we did not use miraculously fits, which I highly doubt. I am not generally that lucky.

Photos attached showing various stages of a very productive and enjoyable day. Also, note new rear tires, which are in place and ready to go.

What remains: emergency brake cable, complete interior (seats started this week), covers for shift linkage and compartment where MSD is mounted, coolant expansion tank, a bracket to make sure the remote oil filter lines don't touch the portside CV joint, a few remaining things on wiring, windscreen washer nozzles, mirrors (after the seats are further along)... and no doubt a few more small details. And the matter of the possible leak in the rear main seal, which we hope isn't the rear main seal but something less malignant. But a great deal has been accomplished and things are looking good. There is also some remedial painting left to do...stuff we scratched up. I guess that is inevitable...

Note also the heat insulation on the inside of the rear deck- a one piece stuff allegedly made of crushed lava. We'll see how it works. If it stays in there and does its job I'll be delighted.
 

Attachments

  • P1231960.jpg
    P1231960.jpg
    63.2 KB · Views: 492
  • P1231962.jpg
    P1231962.jpg
    60.7 KB · Views: 486
  • P1231966.jpg
    P1231966.jpg
    58.9 KB · Views: 461
  • P1231969.jpg
    P1231969.jpg
    55.3 KB · Views: 468
  • P1231972.jpg
    P1231972.jpg
    45.5 KB · Views: 453
  • P1231980.jpg
    P1231980.jpg
    55.7 KB · Views: 473
  • P1231981.jpg
    P1231981.jpg
    52.1 KB · Views: 482
  • P1231985.jpg
    P1231985.jpg
    52.8 KB · Views: 484
  • P1231989.jpg
    P1231989.jpg
    43.4 KB · Views: 454

Jim Rosenthal

Supporter
Things moving along, although no new photos because I have been too busy with work to get up to Hampstead to visit the car. However, the wheels and spinners are painted, all th metal parts powder coated and most of them installed, the installation of the seat harnesses has begun, and tomorrow I am due to visit the trimmers and see how they are doing on the seat backs. This coming weekend (after a brief trip out of town) I am going to tackle making the webbing rigging for the seats and see how good I am at it. That will require driving up to the car and I will post some new photos at that time. I might even clean her up a bit for this next set, getting close to another test run, so we have to clean her up so we can get things muddy again....
 

Jim Rosenthal

Supporter
Out of town in New Orleans to look at a car, and came home to find photos of the installed seat harnesses in the car....very nice indeed. I'll post photos tomorrow of the seat backs, which I plan to put back in. We are going to begin looking at the webbing and see if we can start that.

New Orleans was cold and wet. It appears that the entire country is suffering through winter, even FL the weather is bad...
 

Jim Rosenthal

Supporter
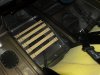
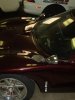
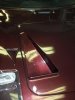
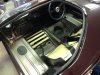
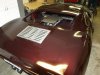
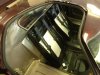
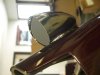
Some images from today. The Vitaloni Sebring mirrors which I got from Jesus Pozo are now mounted, and look great- thanks again, Jesus. Likewise the seat harnesses, which came from Olthoff Racing- these are SPF takeouts from someone who wanted track approved ones for their GT40 track car. But these will work fine for me. You can also see the fabric inserts in the seat backs- these were done by Bay Country Upholstery in Annapolis. (see below) Next thing is the webbing.

For this car, since it has a Mark I monocoque, I decided to try to reproduce the seats as they were in a Mark I car. Essentially the construction is as follows: the back of the seat, the thing you sit against, is a molded fiberglass piece which has fiberglass inner rails glued into it. A fabric panel is suspended between the rails, laced into plastic grommets which are inserted into holes drilled into the forward and inner faces of the fiberglass rails. The pacing is done with parachute cord or something similar. The photos I had from Jay, of an original seat, showed a ventilated material with metal grommets in it. The upholsterers here used something a bit different- they used a screen material called Textilene, which does not stretch much and is hardy enough for outdoor use. At the sides, where you see the white solid material, the Textilene is oversewn with a material called Weblon, which is used for making awnings and boat canvas. Small cutouts in the material at the sides allow for the lacing. The lacing is passing around two small steel rods that are at the very sides of the fabric panel. This arrangement should be quite strong and also not bothered by heat etc as these are all outdoor materials which are left out in the sun on boats.
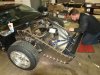
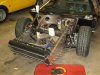
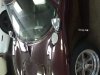
That is what you sit against. What you sit ON in a Mark I is basically a webbing trampoline, made of Pirelli webbing stretched between the metal seat rails which are part of the welded structure of a Mark I GT40 chassis. That is the next thing we have to do- make up the trampolines. After that, the upholstered part is done- the seat back is removed and covered with leather and padding, and the bottom part of the seat is a sort of tongue-shaped construction of more leather and padding (or nylon cloth and padding0 which sits on top of the webbing trampoline and is held to the car by snaps. It is this last part that you see when you look at the interior of a GT40- the nylon cloth or leather areas are the ones with the grommets, or no grommets in the case of my car. But that is what you are actually looking at.

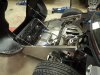
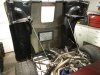
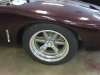
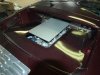
In race cars, the fiberglass seat backs were held in with Dzus fasteners and metal brackets which were customized more or less to each car, as near as I am able to figure. Street cars (like 1072) just had a bolt on the back of that part of the seat which passed through the engine compartment access panel and was secured by nuts on the other side. This arrangement is less secure- the seat back can rock back and forth a bit- and even though this is a street car, we used the Dzus fastener setup which is three brackets and fasteners. Seems fairly secure.

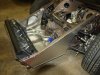
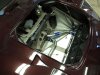
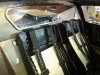
The seat harnesses are secured to a steel rail, part of the chassis, which runs transversely under the glass window between the engine area and the passenger space. AN bolts and spacers hold the metal part of the shoulder harnesses, and metal trims powder coated black finish the slots that the fabric comes through in the rear bulkhead. There are already bolt holders welded into the chassis for the lap parts of the belts, all very neatly done.

Some of the parts for the webbing trampolines came from Forum members, others from GT40 restoration experts. Much obliged to all. I'll post photos as soon as we have something done on those...
 

Attachments

  • P2061993.jpg
    P2061993.jpg
    41.9 KB · Views: 371
  • P2061995.jpg
    P2061995.jpg
    48 KB · Views: 419
  • P2061997.jpg
    P2061997.jpg
    52.8 KB · Views: 398
  • P2061999.jpg
    P2061999.jpg
    35.2 KB · Views: 385
  • P2062000.jpg
    P2062000.jpg
    38.8 KB · Views: 366
  • P2062007.jpg
    P2062007.jpg
    28.1 KB · Views: 385
  • P2062011.jpg
    P2062011.jpg
    37.7 KB · Views: 376

Chuck

Supporter
Jim: Beautiful. The information on the original seat design very interesting. I suspect those seats will be a bit more comfortable on a long drive than the simple designs used on current reproductions.
 

Jim Rosenthal

Supporter
They seem comfortable- at least the angle seems to work well. After we had the seat backs reinstalled, I sat in the car and we figured out where the mirrors ought to go. It is a little disconcerting trying to determine this when you are sitting on the opposite side of the car from where you usually sit. But I think they are okay. They certainly look the part; these seem the same ones that were on some street GT40s back in the day. We used foam rubber padding to try to get the seating surfaces up to about the level they will be when all the upholstery and trimming are done. I also have to figure out something about carpeting- what to use, assuming it will get wet, and not wanting the car to smell like a sheepdog that has been locked outdoors when the interior is damp. Wool carpet looks and wears better, but nylon won't stink when wet. I'm open to suggestions on all this. It will be black, whatever we use- nothing fancy here. Does anyone know what was in the original street cars back in the day?
 

Jim Rosenthal

Supporter
Yes, I got it from Andrew Booth, who cleaned it up and fitted the ball and socket arrangement which mounts it to the inside of the windscreen. (that set of parts is made by Jay Cushman, copies of original items) All we have to do now is glue them to the inside of the windscreen. Ron's glass man has some adhesive that is better than the stuff you get at Pep Boys etc.

If you look at photos of original cars, there is a lot of variation in where the inside mirror was mounted. My photos of 1072 show it pretty much in the middle; others show it way over to the left side, but over there it will block the view out front from the passenger's seat. So we kept it pretty much in the middle of the glass, and it seems it will work fairly well there. These are not cars with great rear visibility, but I can see pretty well out the back, and the reversion plate should keep the large plastic rear window from getting too foggy- at least I hope so. I think between the three mirrors I will have some idea of what's going on back there- as in who's disappearing behind me. ;)
 

Rick Muck- Mark IV

GT40s Sponsor
Supporter
These are not cars with great rear visibility, but I can see pretty well out the back, and the reversion plate should keep the large plastic rear window from getting too foggy- at least I hope so. I think between the three mirrors I will have some idea of what's going on back there- as in who's disappearing behind me. ;)

"Whatsa behinda me, is of no concerna to me" as he rips the mirror off the post.......
 
Jim,
I had a terrible accident in a Lotus turbo Esprit years ago just because I coouldn't judge how close the guy in the other lane was(was trying to change lanes). When I looked forward the pickup truck in front of me had stopped. I even had a small fisheye mirror tacked on. Those small mirrors aren't good for much. You may not think much of an unoriginal rear view camera, but I can tell you it is worth it. I am trying to work out a system that my side mirrors will hide two cameras. A central camera can be installed under the rear glass to let you know as well. The cameras are small enough that they just about can't be seen. Some of the monitors look like rear view mirrors and actually function as a mirror when the units are turned off.There is a new thread just started on mirrors and rear view cameras. Food for thought.

Bill
 

Jim Rosenthal

Supporter
I'll look at them.. you aren't the first to suggest it. There is room to hide the camera and extra circuits to power it. I'll have to see how the car feels. There is a surprising amount of view in the Vitaloni mirrors, though. Now, my Cobra- if that wasn't an open car, I would have problems. If I ever put a soft top on it, I'll have trouble seeing what's behind me and to the sides...
 

Jim Rosenthal

Supporter
Spent most of the day up at Ron's working on the car, figuring out how to put together the webbing trampolines. After some trial and quite a bit of error, I got five of the cross-straps done, and in the car. I will attach photos this evening after I've had a chance to download them from my camera.

Also, some more metal pieces- a cover for the area that the ignition box resides in, and the cover for the shift linkage, which John brought over- both very well made and look great.

It took me about six hours, minus a run to the Golden Arches for lunch, to make five straps. However, I got better at it as it went along, and I think I can knock out the rest of it all in about two or three more days of working on it. If this is what restoring an original car entails, I can see why it is so expensive.

Photos to follow...
 

Jim Rosenthal

Supporter
Photos of the following:
-the webbing trampoline straps, in place. My first efforts were dismal and I won't post those. I have three to go and then the two fore-and-aft straps to put in. Notice I started on the passenger's side...
-steel cover made by John, for the MSD box recess- this will get powder coated the same steel gray as the reversion plate over the Webers, then bolted into place.
-shift linkage cover, which is just sitting in place right now, and will require a bit more metalwork to be completed, then to be painted black and fastened into place with screws and nutserts.
-Dzus fasteners for the nose panel insert. Original cars had steel "flags" welded to the Dzus fasteners, which were then chromed. (there is a very good photo of this on the Racing Icons web site). Ron had the SS flags left over from his car, never used- John set them into the Dzus fasteners, but instead of welding them, tapped them into a drilled hole with some epoxy, which ought to hold them.

I also added a photo of the car with the mirrors in place, oriented correctly.

We are supposed to have some decent weather here in Maryland- maybe a test drive again in a week or two is not out of the question. Then again, this time of year, one never knows, do one?
 

Attachments

  • P2122027.jpg
    P2122027.jpg
    39.2 KB · Views: 370
  • P2062012.jpg
    P2062012.jpg
    21.6 KB · Views: 343
  • P2122019.jpg
    P2122019.jpg
    20.5 KB · Views: 342
  • P2122021.jpg
    P2122021.jpg
    29.5 KB · Views: 341
  • P2122024.jpg
    P2122024.jpg
    49.1 KB · Views: 368
Back
Top