
- Forums
- GT40 Replica Manufacturers' Corner
- RCR Forum - RCR40/SLC/917/Superlite Aero
- The SLC Clubhouse
You are using an out of date browser. It may not display this or other websites correctly.
You should upgrade or use an alternative browser.
You should upgrade or use an alternative browser.
Rumbles SLC Build
- Thread starter rumbles
- Start date
-
- Tags
- g50 gear ls3 powernation rumbles slc superlight yellow
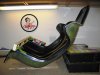
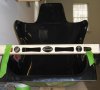
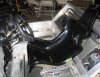
One of the things I've been mocking up is the seat position. I taped a level with a digital degree readout on to the flat thigh area of the seat. Then I placed it in the car and tried to find a good compromise between a comfortable seating angle and headroom. I came out with a 22 degree seating angle.
However, at 22 degrees I’m down low looking thru the steering wheel like a blue haired grandma.
When I look at the seat angle up on my bench, it looks like the 22 degrees is raked back too far.
Is this about the same seat angle that you all are using?
However, at 22 degrees I’m down low looking thru the steering wheel like a blue haired grandma.
When I look at the seat angle up on my bench, it looks like the 22 degrees is raked back too far.
Is this about the same seat angle that you all are using?
Attachments
Its really about what works for you Bill. Im layed back about 15-18 degree's in my race car, its comfortable for me, gives me more head room, lowers the weight in the car a little bit
Is your steering wheel at the most comfortable spot for you? Maybe moving it closer will help make it more comfortable for you and change having to look through it?
Is your steering wheel at the most comfortable spot for you? Maybe moving it closer will help make it more comfortable for you and change having to look through it?
Ken Roberts
Supporter
Bill for me it was the seat "back" angle that was important. From memory I think my most comfortable position was close to 45 degrees. It almost matched the angle of the large panel concealing the fuel tank.

It almost matched the angle of the large panel concealing the fuel tank.
Yep also - my seat back angle is almost parallel with the interior gas tank panel, but the bottom seat area is also just slightly elevated at the front edge/lip -- GTM donor seat. I don't think I'd care for the front of seat digging into the bottom of my legs.. for a street car. So many different body types in relationship to seats - this has been a real quest around here.
Ours are much more upright. Very close to having the seat bottom level and only the built in angle of the seat back.
same here ... having it angled like some people have is scary to me ... not for safety, but just driving like that freaks me out, couldn't get used to it, hah. I'm 5'7 and only have about 3 finger widths between the roll cage and my head w/ how I have my seat set.
How about some part numbers!
It seems like I spend quite a bit of time looking for just that right part. Here are my most recent finds:
It seems like I spend quite a bit of time looking for just that right part. Here are my most recent finds:
- I moved my front brake lines forward to give me some additional room in the foot box. That left a gaping hole to deal with. Fortunately, Steel Rubber products HQ is just 30 minutes from me. I went there today and rummaged thru their parts and found a plug to cover the original brake line hole. Steel Rubber Products PN 35-0197-31 works great. You will need to enlarge the hole from .6” to .75” to use the plug. See Pic below.
- The optional front lift kit does not include grommets for where the fluid line passes thru the tub wall. Steel Rubber Products PN 32-1069-20 is a perfect fit.
- A few days ago, I mentioned that I found the adapter for the Porsche/BMW clutch slave cylinder. The adapter works, but requires an additional brake line to be fabricated to connect the dots. I found a much cleaner solution today at CV Products. PN FRA650307 is an adapter that fits the slave cylinder and then connects directly to a standard AN-3 flex line.
Attachments
How about some part numbers!.....
Bill, I appreciate the fact that you post parts#'s and where they come from. I've seen too often (mostly on other forums) where somebody will do an install or mod, claim it's the cats meow, and then not say where the stuff came from or have part numbers, and then spend 3-4 future posts answering the stuff that should have been posted up front anyway. Good job - I always look forward to your build thread to see where it's going and maybe even steal a couple ideas for future use. -- Mike
I was looking at VintageAir heater servo and noticed it is a cutoff valve vs a bypass valve. It's my understanding that the LS3 motor needs the coolant to continuosly flow thru the heater lines, even when the heater is shutoff. If the heater lines are blocked, there is no flow thru the expansion tank where trapped air is released from the system.
I looked on the VintageAir website, but did not see a bypass type servo.

Does the VinatgeAir cutoff servo need to be replaced with something like this bypass type from www.streetrodhq.com?

FYI: The top PIC is from Kens Build, so that's Ken's "Flying Fickle Finger of Fate":lol:

I looked on the VintageAir website, but did not see a bypass type servo.
Does the VinatgeAir cutoff servo need to be replaced with something like this bypass type from www.streetrodhq.com?
FYI: The top PIC is from Kens Build, so that's Ken's "Flying Fickle Finger of Fate":lol:
Last edited:
I'm using the latter valve for the reason you mentioned.
It's easy to plumb in, and the right choice for LS engines, as I understand the cooling circuit. It's discussed in the Build Manual.
It's easy to plumb in, and the right choice for LS engines, as I understand the cooling circuit. It's discussed in the Build Manual.
Does the VinatgeAir cutoff servo need to be replaced with something like this bypass type from www.streetrodhq.com?
Yes, for the reason you stated.
You also have a vacuum actuated option.
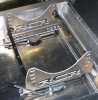
I got my driver seat installed.
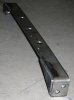
I mocked up a couple different approaches and landed on a hammock design. I fabricated front & rear 1/8" steel straps that go under the seat and bolt to the RCR seat brackets.
The under seat braces also have 2 nuts welded on the end about 1/2” apart. The slots in the RCR seat bracket are spaced 1” apart, so the combination allows ½” position adjustments throughout the full range
Once I have the final seating position, I plan to permanently fiberglass them to the underside of the seat. The under seat straps have 3 large holes in the middle to give the fiberglass something to grab on to, so they won’t slip around.
I decided to go with seat sliders after all. That raised the seat brackets about 1” so I drilled a lower set of adjustment slots in the front to compensate.
The end result is quite strong.
Attachments
Last edited:
Nicely done and very simple....
Ken Roberts
Supporter
Bill my electronic servo valve is for sale if you're interested as I've installed a vacuum operated AC Delco valve instead. It's brand new and converted to be automatically controlled with the AC activation. This means that when the AC is commanded the valve automatically will switch to the recirculate back to engine mode and not through the heater core. This is accomplished with a relay.
Here is a picture of it mocked up.

Here is a picture of it mocked up.
I've always though it wasn't "back-pressure" that made low end torque, it was exhaust gas velocity.
IMO cats won't really give you low end torque, though, sometimes people have lost horsepower when taking them off, but I would believe that is because the car is not tuned for the lessened back-pressure, and you might have a run lean issue.
As high flow as cats are today, I would think you might not even miss 20hp or so anymore off the top end unless you were making some really insane HP.
Last edited:
Craig Sinasac
Supporter
Hey Bill,
What seat sliders did you go with? They look great.
Cheers,
Craig
What seat sliders did you go with? They look great.
Cheers,
Craig
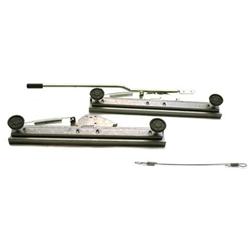
The best price I found for seat sliders was at Speedway Motors. Just $25. Since the seat structure is flexible fiberglass (vs steel) make sure you get sliders like these that have a position locking mechanism on both runners.
Bill for me it was the seat "back" angle that was important. From memory I think my most comfortable position was close to 45 degrees. It almost matched the angle of the large panel concealing the fuel tank.
Man I love the Tillet seats... But are they ever expensive... I was planning to buy a set, but so far I can't find a good enough reason to stop listening to common sense... (at least in my case)...
Maybe after I finish my car, and I don't have as much going into it on a constant basis...
They sure are sleek though, and they look somewhat comfortable.
Last edited:
Similar threads
- Replies
- 26
- Views
- 8K
- Replies
- 7
- Views
- 6K
- Replies
- 4
- Views
- 10K