Click -> here for a video that shows more details on my SLC.
The video is a bit at 11 minutes, but don't miss the last couple minutes.

The video is a bit at 11 minutes, but don't miss the last couple minutes.

")

I don't see any fasteners on your side windows ? How did you mount them ?
LOVE the yellow w/black !!
Actually, there are some very subtle mechanical fasteners on the side and rear windows that are not normally noticed.
All the Lexan windows are held in place and sealed with 3M Windo-Weld 1/4" ribbon. The professional who installed my windshield recommended 3M Windo-Weld for the Lexan.
- The side windows are mechanically clamped in place with the hippo mirrors. The side window fits the contour of the body very snugly so no other fasteners are needed.
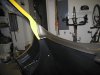
- The rear window fits the contour of the upper body, but pulls away from the lower body. I've found that if there is a constant tension between 2 parts, any adhesive will eventually fail. So I fabricated 3 small clips that barely wrap around the edge of the Lexan and are blind bolted thru the fiberglass lip from inside. I painted the clips black to blend into the border.
Here's a test. Can you see the rear window clips in the attached photo?

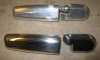
I open my front clam frequently to access the trunk, and the exposed lower door hinge looked a bit unfinished to me. I fabricated this cover to clean up the hinge area.
During the bodywork on this part, it became known simply as the "Athletic Cup" :shocked2: