
You are using an out of date browser. It may not display this or other websites correctly.
You should upgrade or use an alternative browser.
You should upgrade or use an alternative browser.
Rob's RCR40 Build
- Thread starter VintageVenom
- Start date
Rob
Lifetime Supporter
Yep....I live in Davisburg. Stones throw away from ya.
Unfortunately......I am not planning on tracking the car anymore prior to sale. I only take em out to shake em down and make sure all systems are go before ...they go. Very much so looking forward to shaking down the next one, as I really enjoyed driving it!
I am however planning on being at The Hill again on labor day weekend with the Shelby club. I'll be running my Mach I though. (For the record, it is no where near as fun as it used to be before having taken the 40 out there. Me thinks I got a bit spoiled...:sad:...)
..... prior to sale. .....)
WATCHU TALKIN' 'BOUT WILLIS???? :shocked:
Rob
Lifetime Supporter
Yep....that's the fact "Arnold". Once completed I will be selling it. Then immediately ordering the next one from Fran the Man. Simply put, I enjoy building cars..... some guys golf, some bowl....I build. Wish I could keep em all, but that just isn't feasible. Admittedly....this one will be a bit tough to let go of.:cry:
Rob
Lifetime Supporter
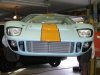
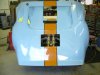
Spit polish and finish assembly has begun.....
- Installed and wired the front lights
- Finally put the Dymo label maker to work on the dash labels
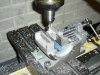
- Started machining up mounting bases for the body side latches
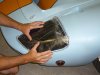
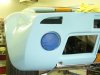
- "Fitted" the plexi light covers. Will install once hardware shows up from McMaster Carr. Planning on riv-nutting with stainless button heads.
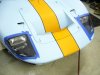
- Started on the buffing.... Got the first pass complete on the rear clip today. Found a couple spots I need to spend some more time wet sanding, but moving along......
- Installed and wired the front lights
- Finally put the Dymo label maker to work on the dash labels
- Started machining up mounting bases for the body side latches
- "Fitted" the plexi light covers. Will install once hardware shows up from McMaster Carr. Planning on riv-nutting with stainless button heads.
- Started on the buffing.... Got the first pass complete on the rear clip today. Found a couple spots I need to spend some more time wet sanding, but moving along......
Attachments

Another "trick" is to tape off the border as suggested for painting, then apply several layers of tape to the entire plexi part. Put it in your blast cabinet & lightly blast the remaining border before painting. This makes for a good pebble appearance around the part and the paint really has something to hold on to as well.
Rob
Lifetime Supporter
Thanks gents....
Yep....fun fun fun.... :thumbsup: NOT But they sure look cool now!
I originally was planning on blacking out the edge, for this reason I masked to the center of the plane. However, I recently realized 1076 had no black on this plane (interface plane to lense). So, was thinking about my options while sanding ...sanding... sanding. No epiphanies just yet.
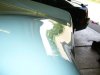
However, Molleur's comments are not a bad idea. I did this on the Daytona coupe windshield. Masked off an ~1.0" border around the glass, blasted and painted it. It looked great. May consider doing the same and painting the body color. Hmm....will have to ponder it some more.
Yep....fun fun fun.... :thumbsup: NOT But they sure look cool now!
I originally was planning on blacking out the edge, for this reason I masked to the center of the plane. However, I recently realized 1076 had no black on this plane (interface plane to lense). So, was thinking about my options while sanding ...sanding... sanding. No epiphanies just yet.
However, Molleur's comments are not a bad idea. I did this on the Daytona coupe windshield. Masked off an ~1.0" border around the glass, blasted and painted it. It looked great. May consider doing the same and painting the body color. Hmm....will have to ponder it some more.
However, Molleur's comments are not a bad idea. I did this on the Daytona coupe windshield. Masked off an ~1.0" border around the glass, blasted and painted it. It looked great.
Another method that would accomplish this, for those of us who do not have our own blast cabinet, would be to head for the nearest city big enough to have a stained glass shop. Get some glass etching solution, prepare the glass as described, then you just apply the etching solution with a foam brush. 15 minutes later you have a fabulously "toothy", paintable surface with very sharp edges (as long as you applied the masking correctly).
The newer etching compounds are much more environmentally friendly, too...
Wouldn't work on the plexi headlight covers, though--only glass.
Doug
Haven't tried it, but what about something like Acetone? Would it etch the plexiglass sufficient to make it suitable for paint?
Might be more likely to melt it or turn it cloudy--laquer thinner would be my suggestion if one wanted to experiment with solvents. I'd be more inclined to take a piece of emery cloth to the plexi, once you had it masked. All you need is some ridges to create a less slippery contact surface for the paint.
Doug
tape it off and use fine steel wool to abrade it safely
What paint does one use? I assume any paint will look shiny through the plexi glass regardless if it is satain, gloss or flat. Simple spray enamel, like engine paint work? I assume one should stay away from laquer paints. What about model kit spray paint? It would be safe for plastic.
What paint does one use? I assume any paint will look shiny through the plexi glass regardless if it is satain, gloss or flat. Simple spray enamel, like engine paint work? I assume one should stay away from laquer paints. What about model kit spray paint? It would be safe for plastic.
I'd say use any decent quality enamel, certainly model car paint (maybe Paolo is following this thread), although sprayed laquer does dry very quickly and might be a good option--I'd test it on a small area that would be fairly easy to touch up should the lacquer solvent have any adverse effects on the plexi...
Another option would be to use a vinyl paint. Most auto parts stores sell it as upholstery paint. I once painted a set of white bucket seats black and then drove the car for 2 years. There was no white showing through when I disposed of the car, that stuff's that good.
Doug
I used automotive enamel on my back window. It was the same paint I used on the dash.
tape it off and use fine steel wool to abrade it safely
Exactly....
Krylon now has paints made especially for plastic and better adhesion. I would check those out...
Similar threads
- Replies
- 18
- Views
- 9K