
You are using an out of date browser. It may not display this or other websites correctly.
You should upgrade or use an alternative browser.
You should upgrade or use an alternative browser.
Rob's RCR40 Build
- Thread starter VintageVenom
- Start date
Rob
Lifetime Supporter
Chuck,
I absolutely agree with Molleur, lacquer thinner and acetone will bleed under the tape line. I would strongly not suggest trying this. I still say best approach is sand blasting. A small project like that can be done with a little hand held jobbie that you can get at Craftsman or Summit and can be done standing in your yard or driveway, no cabinet needed. Use a fine silica sand and just give it a dusting to take off the gloss. I also agree about the type of paint used. Don't suggest rattle cans for any body surface type finishes for that matter.....")
I absolutely agree with Molleur, lacquer thinner and acetone will bleed under the tape line. I would strongly not suggest trying this. I still say best approach is sand blasting. A small project like that can be done with a little hand held jobbie that you can get at Craftsman or Summit and can be done standing in your yard or driveway, no cabinet needed. Use a fine silica sand and just give it a dusting to take off the gloss. I also agree about the type of paint used. Don't suggest rattle cans for any body surface type finishes for that matter.....
Tamiya make paint in small spray cans specifically for spraying under lexan remote control bodies. With proper preparation this paint sticks very well to the clear plastic. Trick is to apply a few light coats to build up the finish as the gloss level is not important on the back of the plastic.
This is what I intend to use when I'm up to this stage in about 15 years!
This is what I intend to use when I'm up to this stage in about 15 years!
Rob
Lifetime Supporter
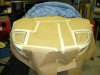
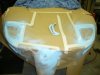
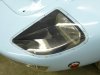
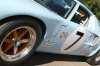
Finished the head light buckets this weekend. Ultimately decided that there was only one way that I could do it that I would be OK with. So, jumped in prepped, masked and painted the bucket lips. Took all weekend, but I can feel good about the result, and won't regret the end appearance.
For the record, I did do a test panel of sand blasting and painting. It looked good. From the top side the luster was beautiful. This would be a totally OK way to go. What I didn't like was that it "looked" like the underside of the plexi was painted, as there was a missing perception of depth and gap between the two surfaces. This is not what I was looking to achieve.
Anyway...once that was finished I got back to the wet sanding and rubbing out the paint. Probably about 60% done with first pass at this point.
Attachments
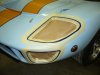
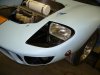
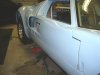
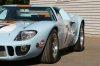
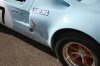
Rob, awesome job trimming and fitting the plexi pieces. They look great on the car with the black-outs.
Rob
Lifetime Supporter
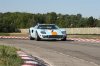
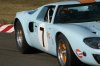
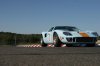
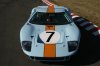
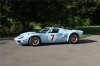
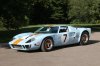
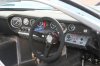
I Had the Mach I on track on Sunday, so took advantage of the photo op with the 40....
Thought I'd share.
Thought I'd share.
Attachments
-
 IMG_2226a.jpg45.6 KB · Views: 487
 -
 IMG_2257a.jpg38 KB · Views: 484
 -
 IMG_2263a.jpg27.9 KB · Views: 428
 -
 IMG_2286a.jpg30.8 KB · Views: 429
 -
 IMG_2369a.jpg43.8 KB · Views: 532
 -
 IMG_2378a.jpg48.3 KB · Views: 492
 -
 IMG_2396a.jpg43.4 KB · Views: 494
 -
 IMG_2407a.jpg42 KB · Views: 455
 -
 IMG_2411a.jpg37.7 KB · Views: 420
 -
 IMG_2422a.jpg37.4 KB · Views: 629
Craig Gillingham
Banned because I can't follow the forum rules.
great job...great photos....build finished?
cheers
cheers
Magnificent Job, Thats a awsome looking car.
The advantage of painting the back of the headlight covers is also that any dirt and dust going inbetween it and the body ( And i know from my motorcycle windscreens that there will be a lot of things going there especially in this exposed area) will not be visible. As cool it looks, i believe it won´t stay like this for long if the car is driven.
But with the setup you have right now, there is always the opition to repaint also the covers.
TOM
Rob
Lifetime Supporter
While bringing the car out onto the track on Sunday I accidentally passed the spot I wanted to take the pictures at .......twice 
Actually, I bought a new camera to capture a couple laps since the other videos sucked so bad. So ... here it is...this time crystal clear.
Waterford Hot Lap
Actually, I bought a new camera to capture a couple laps since the other videos sucked so bad. So ... here it is...this time crystal clear.
Waterford Hot Lap
I know it's got tro be bunches more fun when its at full throtle. You didn't seem to have any trouble getting it up into the revs this go round!!! Excellent video. What equipment did you use for the video??
Bill
Bill

Similar threads
- Replies
- 18
- Views
- 9K