Yup, the Current Performance harness eliminated the ECU wires to the oil pressure sensor and oil temp sensor. The ECU does still need the water temp sensor to tune the fuel mixture to the heat in the motor. The additional bung I drilled in the water pump is for a separate water temp gauge for the dash.
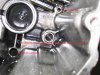
You may have noticed that there is a factory bung in the water jacket of the passenger head as well. This could be used for a dash gauge sender, but the coolant there is 20 degrees cooler.
The Current Performance harness also included relays and heavy wiring to control / power 2 fans via the ECU.
On the fuel rail quick disconnect, I used a Dorman part that is barbed on the other end of the fitting. My SLC will be a street car so I'm using regular EFI hose instead of going the AN fitting route.
")