Rob's RCR40 Build

Rob

Lifetime Supporter
Thanks Ron....
Well...one gallon of primer gone..... Will start wet sanding in the morning.:pepper: Significant mental milestone for me.
 

Attachments

  • P1090744.jpg
    P1090744.jpg
    50.6 KB · Views: 1,819
  • P1090751.jpg
    P1090751.jpg
    48.6 KB · Views: 1,778
  • P1090756.jpg
    P1090756.jpg
    44.7 KB · Views: 1,759
  • P1090758.jpg
    P1090758.jpg
    39.8 KB · Views: 1,810
  • P1090765.jpg
    P1090765.jpg
    46.4 KB · Views: 1,733
  • P1090767.jpg
    P1090767.jpg
    41.1 KB · Views: 1,721
  • P1090768.jpg
    P1090768.jpg
    26.9 KB · Views: 1,752
  • P1090769.jpg
    P1090769.jpg
    24.2 KB · Views: 1,738

Rob

Lifetime Supporter
Hi MReid,
Heck...I'm just trying to keep up with the Jones. There's a whole bunch of RCR builders making me feel like a big slacker...:eek:

Yes, I have decided. It will be......gulf.....yes I know a bunch of you just said.....uuuhhhh..... But I have always wanted one. Minor twist is it will be like 1076 from 69 LeMan, with the single stripe.
 

Rob

Lifetime Supporter
Well didn't get as much done today as has hoped. Too much normal life stuff slowed me down...couple oil changes...kids wanted slip and slide set up....blah blah. Anyway Mr. Miagi would probably have said I did enough "wax on wax off" for one day anyway. Did it long enough to get sun burned that's for sure....:mad:

Rear clip is just about done. Now that I can see a shiny surface on them (i.e. smooth and wet) I am really pleased with how the flares turned out.
 

Attachments

  • P1090793.jpg
    P1090793.jpg
    54 KB · Views: 1,675
  • P1090794.jpg
    P1090794.jpg
    44.3 KB · Views: 1,624

Rob

Lifetime Supporter
and "Poof".....there it is.... just like that. :D
 

Attachments

  • P1090976.jpg
    P1090976.jpg
    56.3 KB · Views: 1,634
  • P1090967.jpg
    P1090967.jpg
    50.3 KB · Views: 1,617
  • P1090973.jpg
    P1090973.jpg
    38.6 KB · Views: 1,610
  • P1090974.jpg
    P1090974.jpg
    44.8 KB · Views: 1,609
  • P1090975.jpg
    P1090975.jpg
    30 KB · Views: 1,593
  • P1090980.jpg
    P1090980.jpg
    23.4 KB · Views: 1,557
  • P1090978.jpg
    P1090978.jpg
    33.4 KB · Views: 1,588

Randy V

Moderator-Admin
Staff member
Admin
Lifetime Supporter
I'm so darned jealous!!! :)

I love the Stripe on the inside too!! It's now part of my plan!! :)
 
the car's looking great, i love the blacked headlight buckets. did you use black, or a dark blue to outline the stripe?
 

Rob

Lifetime Supporter
Thanks guys....
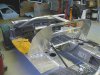
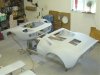
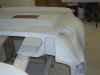
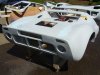
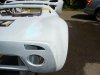
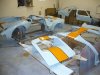
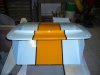
Turned out to be the most time consuming paint job I have done to date. I tried a new method for the stripe work. Either brilliant or idiotic.... jury still out. I'll decide during wet sanding.... I painted the colors next to each other, rather than on top of one another. The goal was to eliminate any material thickness build so there was "no" rise at all in the clear coat. What a monumental PIA. ~ 23 hours of accumulative taping time over Sun & Mon. I ended up having to take a vaca day on Mon. to finish. Well..actually not done yet. Had a bunch of bugs find there way into the garage, and didn't want to permanently preserve them in the clear coat, so decided to stop. I'll start wet sanding on Sat and hopefully shoot again on Sunday.

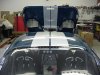
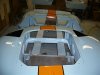
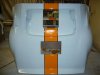
Randy, Glad to hear others think it's cool too. It has kinda turned into one of my trade marks. Done it that way for about the past 8 years. (The tape work underside also added significantly to the above belley aching re time taken.) I dig the view from behind when the lid is up. Here's a shot of the Daytona Coupe done the same way.

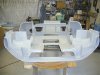
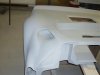
Mark, I took a little builder's liberty with the pin stipe, I did it in black. Really don't like it in blue. Shhh.... don't tell anyone...
 

Attachments

  • 04-10-15 07.jpg
    04-10-15 07.jpg
    52.7 KB · Views: 1,624

Rob

Lifetime Supporter
Orange was DBC 60812
Stripe width was established by reviewing pics and referencing relative size to windshield duct and dzus fasteners. It is 10 3/8" wide, 11 1/8" including the pin stripes. Don't know if this is "correct", but aesthetically I believe it is proportionately accurate.
 
Rob, that looks fantastic! I can't wait to see it reassembled. You should be very proud and if I ever meet you in person, I promise not to say, 'hey, that's not original, your pinstripe is black." Cheers!

I just noticed that your stripe and pin stripe has to just nip the top of the doors. That must have been tough to layout!

Mark
 

Rob

Lifetime Supporter
Mark,
Thanks for the comments and for cutting the slack on the color... ;)


Got quite a bit done this weekend, well .... at least a few time consuming jobs..

A/C evaporator is hung, roll cage and dash are installed, and rear bulkhead is installed.

Spider and drive train should be done next weekend.
 

Attachments

  • P1100958.jpg
    P1100958.jpg
    57.6 KB · Views: 1,325
  • P1100926a.jpg
    P1100926a.jpg
    43.3 KB · Views: 1,280
hi,
i also have a rcr 40 with the same air con assembly as you but im bit confused.
where have you connected the 2 brass tubes to that come from the evaporator?
there also appears to be a brass threaded connection that needs connecting and
as fran is away im looking for some guidance/

by the way, ive been watching your build and used some of your earlier ideas into
my car.

regards
ricky
 
Back
Top