Rob's RCR40 Build

Rob

Lifetime Supporter
Thanks gents,
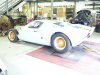
Yep, I like the overhead shot too, I just wish the rear glass and exh cover had already been installed. I love how that shot shows off the body shut lines/door gaps etc. It's just a perspective you don't often get to see of your car.

Howard.....No, I'm not....I openly admit to have fallen in love with this one....:cry:
 

Rob

Lifetime Supporter
Today's project was to fit screens in place of the sock filters that I have been using to date. Using some insights from the discussion we had some time ago, I hunted down some tea balls "infusers" with 2.5" outer diameters. After a few hours on the net, found some available at the local hardware store of all places. For the retention to the velocity stack, I wanted to devise a way that I could easily pop them on and off, yet would look clean and simple. What I came up with was to cut the bellows out of a steering rack boot and use each bellow as the retention band. Cutting them out was a slow going process, but the result is exactly what I was looking to achieve.

When I am on the dyno I will take runs with them both on and off to determine if there is any negative affect on performance. I did a flow assessment with my hand meter, and they had at least 2.5 times the flow of the socks.

.
weberscreens1.JPG


weberscreens2.JPG


weberscreens3.JPG


weberscreens4.JPG
 
I really admire the ingenuity in resolving the myriad of details. Everyone has thier unique method of trial & error. Lots of examples of this on the forum!

Thanks for a great tip!
 

Rob

Lifetime Supporter
Thanks for the positive words guys.

Here is this mornings progress. I have been working/shaping this for a few days now, but just got it to the point where I like it. Near complete, just need to clean it up a bit. Next will be a similar piece for the park brake, then start the carpeting.

shiftercover.JPG
 
Rob,

Nice work all the way around. Where are your attachment points for the cover? How snug against the drivers seat is it?

You are the man! :thumbsup::thumbsup:

Thanks,
Howard
_________________________________________________________________
RCR40 #40 underway
 

Rob

Lifetime Supporter
Hi Howard,
Remarks appreciated.

The cover is indeed tight to the seat, however with the RHD shift box, the seat is tight to the shift box anyway. So, I trimmed the seat base back to the point where it clears the vertical plane of the shift box. Since this was all the usable seat base anyway (the cushion can't touch it, as it's under the box) there was no affect to the cushion. Due to the tight space concern, I maximized usable space by forming reliefs in with body work hammer/dolly to make clearance for the cable snouts coming off the back side of the box. You can see these in the pics.

The cover secures to the shift box with four button heads on the side and four on the top. These can be seen in the photo. Then, it is secured with two more button heads at the rear bulkhead.
 

Rob

Lifetime Supporter
This weekend's progress...
- Made an enclosure for the parking brake sled
- Nearly finished the carpeting. Still need to do some finishing touches. But she's close. Used velcro on the sill plates and snaps on the floor, so the can both be easily removed. I'll post some better pics once it's done....

P1160269.JPG


P1160270.JPG


P1160274.JPG


P1160276.JPG
 
Rob,

Per usual, really nicely done. :thumbsup::thumbsup:
Thanks for the inspirations of your entire build!

Cheers,
Howard
________________________________________________________________
RCR 40 #40 underway
 

Rob

Lifetime Supporter
Finished up the interior today. One of my neighbors is a seamstress, so took advantage of her abilities :stunned: and had her sew in velcro rather than just relying on the sticky back, did some piping edge dressing and made a shifter boot. Seems to work great. In about five minutes time I can completely remove all the carpet. Anyway, interior is marked off the white board. Just need to clean it now, as it's a bit dusty.

Also spent some time doing some wood working on the lathe. That was interesting. That stuff shapes a whole lot easier than metal... Smelled a whole lot nicer than burning cutting oil too......:D Pics will come soon. I am attempting to replicate a vintage knob. Just need to install the heli-coil and she should be good to go.

P1160301.JPG


P1160304.JPG


P1160310.JPG
 
Rob,
I noticed you have your race harness installed. I was ready to install mine when I noticed the expiration date was this month(2 years from date of manufacture). Couldn't believe it had been just over one and a half years since I bought them. At any rate make sure the date is not over two years from the date of manufacture. They have to be sent back to the manufacturer for a recertification(2 additional years). At least most of the makers will. There is a minimal fee(mine was $20). Just a reminder for all you guys.

Bill
 

Rob

Lifetime Supporter
Good reminder Bill. For these I am good to go, as they are Aug 08, but I should check the ones in my Mach I......:uneasy:

Ticked a few more items off the white board this weekend. Only two or three things left to do...:)

Finished the wood shift knob. It looks a lot like the one I intended it to look like (pic of 1008 below), but not sure if I like it. Bummer....since it took a lot of time and the heli-coil thread kit was $50. It looks great when there is no carpeting in, but with the carpeting in I like the black one better.

Plumbed recirculation lines into the cooling system. This took most of the time.

Re-jetted the carbs again to dial them in.

Next on the list is the radiator protective screen and paint the battery cover, then schedule the dyno time. Home stretch....
 

Attachments

  • P1160328.jpg
    P1160328.jpg
    64.2 KB · Views: 440
  • P1160329.jpg
    P1160329.jpg
    63.3 KB · Views: 459
  • DETROI~8.jpg
    DETROI~8.jpg
    58.8 KB · Views: 448
  • P1160337.jpg
    P1160337.jpg
    61.5 KB · Views: 387
  • P1160338.jpg
    P1160338.jpg
    77.2 KB · Views: 399
  • P1160342.jpg
    P1160342.jpg
    53.1 KB · Views: 418
Rob,
Looks like you need to stain the knob a dark walnut/pecan or similar. I thought I had a shot of my friends original, but could not find a pic of it. I seem to remember it as a darker shade than what you have.

Bill
 

Chuck

Supporter
Hey Rob:

The knob looks great. A few hard laps with sweaty palms will likely add to the patina.

If you don't like the knob with your particular interior, just send it to me and I will put it good use . . .

Chuck
 

Rob

Lifetime Supporter
Chuck,......I'll keep that in mind ...:laugh:

Finished the radiator screen yesterday.

Just got back from the dyno shop. Lucked out, recent jetting changes were dead on. Sometimes you just get lucky....

Numbers: 302 BHP / 316 Ft-Lb and mixtures were good, with a hint (~1 point) to the rich side on WOT. Tea ball filter screens were utilized, as this is how it would be run. Temp ran at 185º.

Dyno Pull vid

.
 

Attachments

  • P1160355.jpg
    P1160355.jpg
    37.3 KB · Views: 300
  • P1160356.jpg
    P1160356.jpg
    36.7 KB · Views: 295
  • P1160357.jpg
    P1160357.jpg
    52.5 KB · Views: 313
  • P1160359.jpg
    P1160359.jpg
    48.9 KB · Views: 373
  • P1160360.jpg
    P1160360.jpg
    54.2 KB · Views: 351
  • P1160361.jpg
    P1160361.jpg
    52.3 KB · Views: 329
  • P1160365.JPG
    P1160365.JPG
    61.7 KB · Views: 391

Howard Jones

Supporter
I went back and tried to find the specs on your motor. I didn't. Could you let us know what it is. 289, right? cam, heads, comp ratio?

By the way your car really came out nice. I don't see anything I wouldn't have done myself. Really, really, nice.
 

Chuck

Supporter
Hey Rob:

As I recall you are using IDF carbs. Just curious as to what jets you are using? I suspect our two set ups are pretty close.

Screen looks good. Looks stout enough to stop any big chunks that might get thrown your way . . . .

Chuck
 
Back
Top